Building an alias directory
Introduction
In this tutorial we are going to use the Minka Ledger to build an alias directory. Alias directories are becoming more and more popular, unfortunately there are many different variations in use currently and there is no global standard.
In this tutorial we will model a solution which supports the main concepts common for majority of alias directories:
Aliases
- simple and verifiable identifiers
- usually non financial identifiers
- examples: phone numbers, emails, tax IDs, …
Payment credentials
- additional information linked to aliases
- facilitate making financial operations using aliases
- can represent any valid financial instrument
- examples: bank accounts, credit cards, keys, tokens, …
Lookups
- payments are usually a two step process: lookup + transfer
- user initiates payments using an alias
- the system retrieves additional data by looking up payment credentials
- the payment is made using existing rails with the data from payment credentials
Ledger is built to be flexible, this solution is easy to adapt and tailor to specific needs, if necessary.
Getting started
We will follow through this tutorial by using Minka CLI tool to simulate all interactions with the ledger. This is the simplest way to understand all the actions that need to be performed and see how ledger operates.
In order to follow this tutorial you have to have nodeJS v20 or newer installed on your machine. This tutorial uses a Minka Ledger and our first task is to connect to it.
Install the Minka CLI through your terminal:
$ npm install -g @minka/cliAfter installing the CLI tool, you will be able to interact with local or remote ledger instances by using the minka command. Checkout all the commands available by typing minka --help.
After we have installed a CLI, we can connect to a ledger by typing:
$ minka server connect
? Server URL: <ledger URL>

✅ Connected to server <server name> (<server URL>)

Active ledger: <ledger name>
Ledger security model is based on public key cryptography and each request needs to be signed with a private key. Ledger signers are used to protect and identify people or other entities with rights to sign operations. We can create a local signer which is stored only on our device like this:
$ minka signer create
? Handle: admin
? Key pair source: Generate new key pair
? Add custom data (y/N)? No
? Signer password: [hidden]
? Repeat password: [hidden]

✅ Signer created successfully:
Handle: admin
Public: vMSxaKnOxGUN0B8ovGTMOnGBkU6rD5hyvXfxDdjHV1k=
Secret: [value is hidden]

⚠️  WARNING: Secret or private key is critical data that should be handled
with care. Private keys are used to modify balances and it is important to
understand that anyone who has access to that key can perform sensitive
ledger operations.
Now we have everything ready to start working with the ledger.
Creating our first alias
Ledger wallet records are used to manage balances and represent accounts. Wallet addressing is very flexible which allows us to easily model a simple alias directory using only wallets.
Let’s start by creating our first alias wallet:
$ minka wallet create
? Handle: tel:1333444
? Bridge: [none]
? Schema: tel-alias
? Add custom data? Yes
? Field class: string
? Field title: name
? Field value: John Locke
? Add another field? Yes
? Field class: string
? Field title: bank
? Field value: tesla-bank
? Add another field? Yes
? Field class: string
? Field title: account
? Field value: 1001003
? Add another field? No
? Add routes? No
? Attach a policy? No
? Signer: admin
? Signer password for admin: [hidden]

✅ Wallet created successfully:
Luid: $wlt.rgONl8T76iPgUUhQh
Handle: tel:1333444
Signer: vMSxaKnOxGUN0B8ovGTMOnGBkU6rD5hyvXfxDdjHV1k= (admin)
Custom:
  - name: John Locke
  - bank: tesla-bank
  - account: 1001003
We have added a name into custom data to improve the user experience by showing the name of a target. Custom data is completely optional, it can be used to record any additional data that is required by external systems.
The simplest alias directory implementations with only one payment credential linked to an alias can be done only by using wallets. Using this simple approach we can model a working alias directory with features similar to Pix from Brazil.
Getting the data from ledger is very simple as well. To lookup this wallet we have just created we can use the following command:
$ minka wallet show tel:1333444

Wallet summary:
---------------------------------------------------------------------------
Handle: tel:1333444

Custom:
  - name: John Locke
  - bank: tesla-bank
  - account: 1001003

Access rules:
#0
  - Action: any
  - Signer:
    - public: vMSxaKnOxGUN0B8ovGTMOnGBkU6rD5hyvXfxDdjHV1k=
#1
  - Action: read
  - Bearer:
    - $signer:
      - public:  vMSxaKnOxGUN0B8ovGTMOnGBkU6rD5hyvXfxDdjHV1k=
Access to each wallet can be further controlled using access rules and policies which makes it possible to have granular control regarding the visibility. This is especially important when sensitive personal information is stored in the directory.
All operations performed in this tutorial can be done using REST APIs from any programming language or using our native ledger-sdk from NodeJs which makes it even easier to get started with the ledger.
By only provisioning and making a few basic configurations to the ledger, we already have a fully functional alias directory solution with a feature set that fulfills the requirements defined by most central banks in the world. Downside of this solution is that payment credentials are tied directly to aliases and supports only a single payment credential per alias.
In the next few chapters we will go through several more complex setups to show how to implement a multi-alias and federated alias solutions as well.
Linking multiple accounts
What we did until now solves many popular use cases, but it doesn’t allow us to link more than one account or other payment credential to a single alias. In this chapter we will show how to add this functionality on top of what we already have.
Ledger has a concept of anchors which can be linked to wallets. An anchor is a purely informational ledger record and allows us to query this information in various ways. Most other ledger records have some specific behavior attached to them, anchors have no other purpose than to hold information required to facilitate payments.
We can add an anchor to our alias wallet like this:
$ minka anchor create
? Handle: acc.1003
? Wallet: tel:1333444
? Target: tran:1001003@tesla
? Symbol [empty to skip]:
? Add custom data? Yes
? Field class: string
? Field title: documentType
? Field value: nidn
? Add another field: Yes
? Field class: string
? Field title: documentNumber
? Field value: 320482
? Add another field? No
? Attach a policy? No
? Labels [empty to skip]:
? Signer: admin

✅ Anchor created successfully:

Anchor summary:
---------------------------------------------------------------------------
Handle: acc.1003
Wallet: tel:1333444
Target: tran:1001003@tesla

Custom:
  - documentType: nidn
  - documentNumber: 320482

Access rules:
#0
  - Action: any
  - Signer:
    - public: vMSxaKnOxGUN0B8ovGTMOnGBkU6rD5hyvXfxDdjHV1k=
#1
  - Action: read
  - Bearer:
    - $signer:
      - public:  vMSxaKnOxGUN0B8ovGTMOnGBkU6rD5hyvXfxDdjHV1k=
📖 Explanation of fields:
- handle: unique identifier, we are using acc and last 4 digits
- wallet: the wallet to add this anchor to
- target: external reference, in this case account number
- symbol: currency anchor supports
- documentType: document type of the owner (nidn is national id)
- documentNumber: document number of the owner
To query all anchors for a specific wallet we can use the following command:
$ minka wallet anchor list tel:1333444

╔══════════╤═════════════╤════════════════════╤═════════════════════════════╗
║ Handle   │ Wallet      │ Target             │ Custom                      ║
╟──────────┼─────────────┼────────────────────┼─────────────────────────────╢
║ acc.1003 │ tel:1333444 │ tran:1001003@tesla │ documentType: nidn        	║
║          │             │                    │ documentNumber: 320482    	║
╚══════════╧═════════════╧════════════════════╧═════════════════════════════╝
More advanced queries can be performed as well, for example querying by a specific symbol or even building a custom bridge with complex querying logic.
We can add as many anchors to one wallet as we want, for example, let’s add a credit card to this alias as well:
$ minka anchor create
? Handle: crd.1881
? Wallet: tel:1333444
? Target: card:4012888888881881
? Symbol [empty to skip]:
? Add custom data? Yes
? Field class: string
? Field title: expiry
? Field value: 01/28
? Add another field: Yes
? Field class: string
? Field title: cvv
? Field value: 204
? Add another field: No
? Attach a policy? No
? Labels [empty to skip]:
? Signer: admin

✅ Anchor created successfully:

Anchor summary:
---------------------------------------------------------------------------
Handle: crd.1881
Wallet: tel:1333444
Target: tran:4012888888881881

Custom:
  - expiry: 01/28
  - cvv: 204

Access rules:
#0
  - Action: any
  - Signer:
    - public: vMSxaKnOxGUN0B8ovGTMOnGBkU6rD5hyvXfxDdjHV1k=
#1
  - Action: read
  - Bearer:
    - $signer:
      - public:  vMSxaKnOxGUN0B8ovGTMOnGBkU6rD5hyvXfxDdjHV1k=
In most cases we would store tokenized card data. We use original card information here for demonstration purposes only.
If we repeat the command to get wallet anchors like before, we will now see that we now get two options:
$ minka wallet anchor list tel:1333444

╔══════════╤═════════════╤═══════════════════════╤══════════════════════════╗
║ Handle   │ Wallet	     │ Target                │ Custom                   ║
╟──────────┼─────────────┼───────────────────────┼──────────────────────────╢
║ crd.1881 │ tel:1333444 │ card:4012888888881881 │ expiry: 01/28            ║
║          │             │                    	 │ cvv: 204                 ║
╟──────────┼─────────────┼───────────────────────┼──────────────────────────╢
║ acc.1003 │ tel:1333444 │ tran:1001003@tesla 	 │ documentType: nidn       ║
║          │             │                    	 │ documentNumber: 320482   ║
╚══════════╧═════════════╧═══════════════════════╧══════════════════════════╝
General flow for alias directory solutions is to show the possible payment credentials to users and user selects one of the options in order to make a payment or send money to an alias.
Now we have a more flexible alias directory which can be used to register several types of payment credentials and allow us to query this information efficiently in order to show the required data to users. Below is a diagram of an alias directory flow using the ideas described in this tutorial.
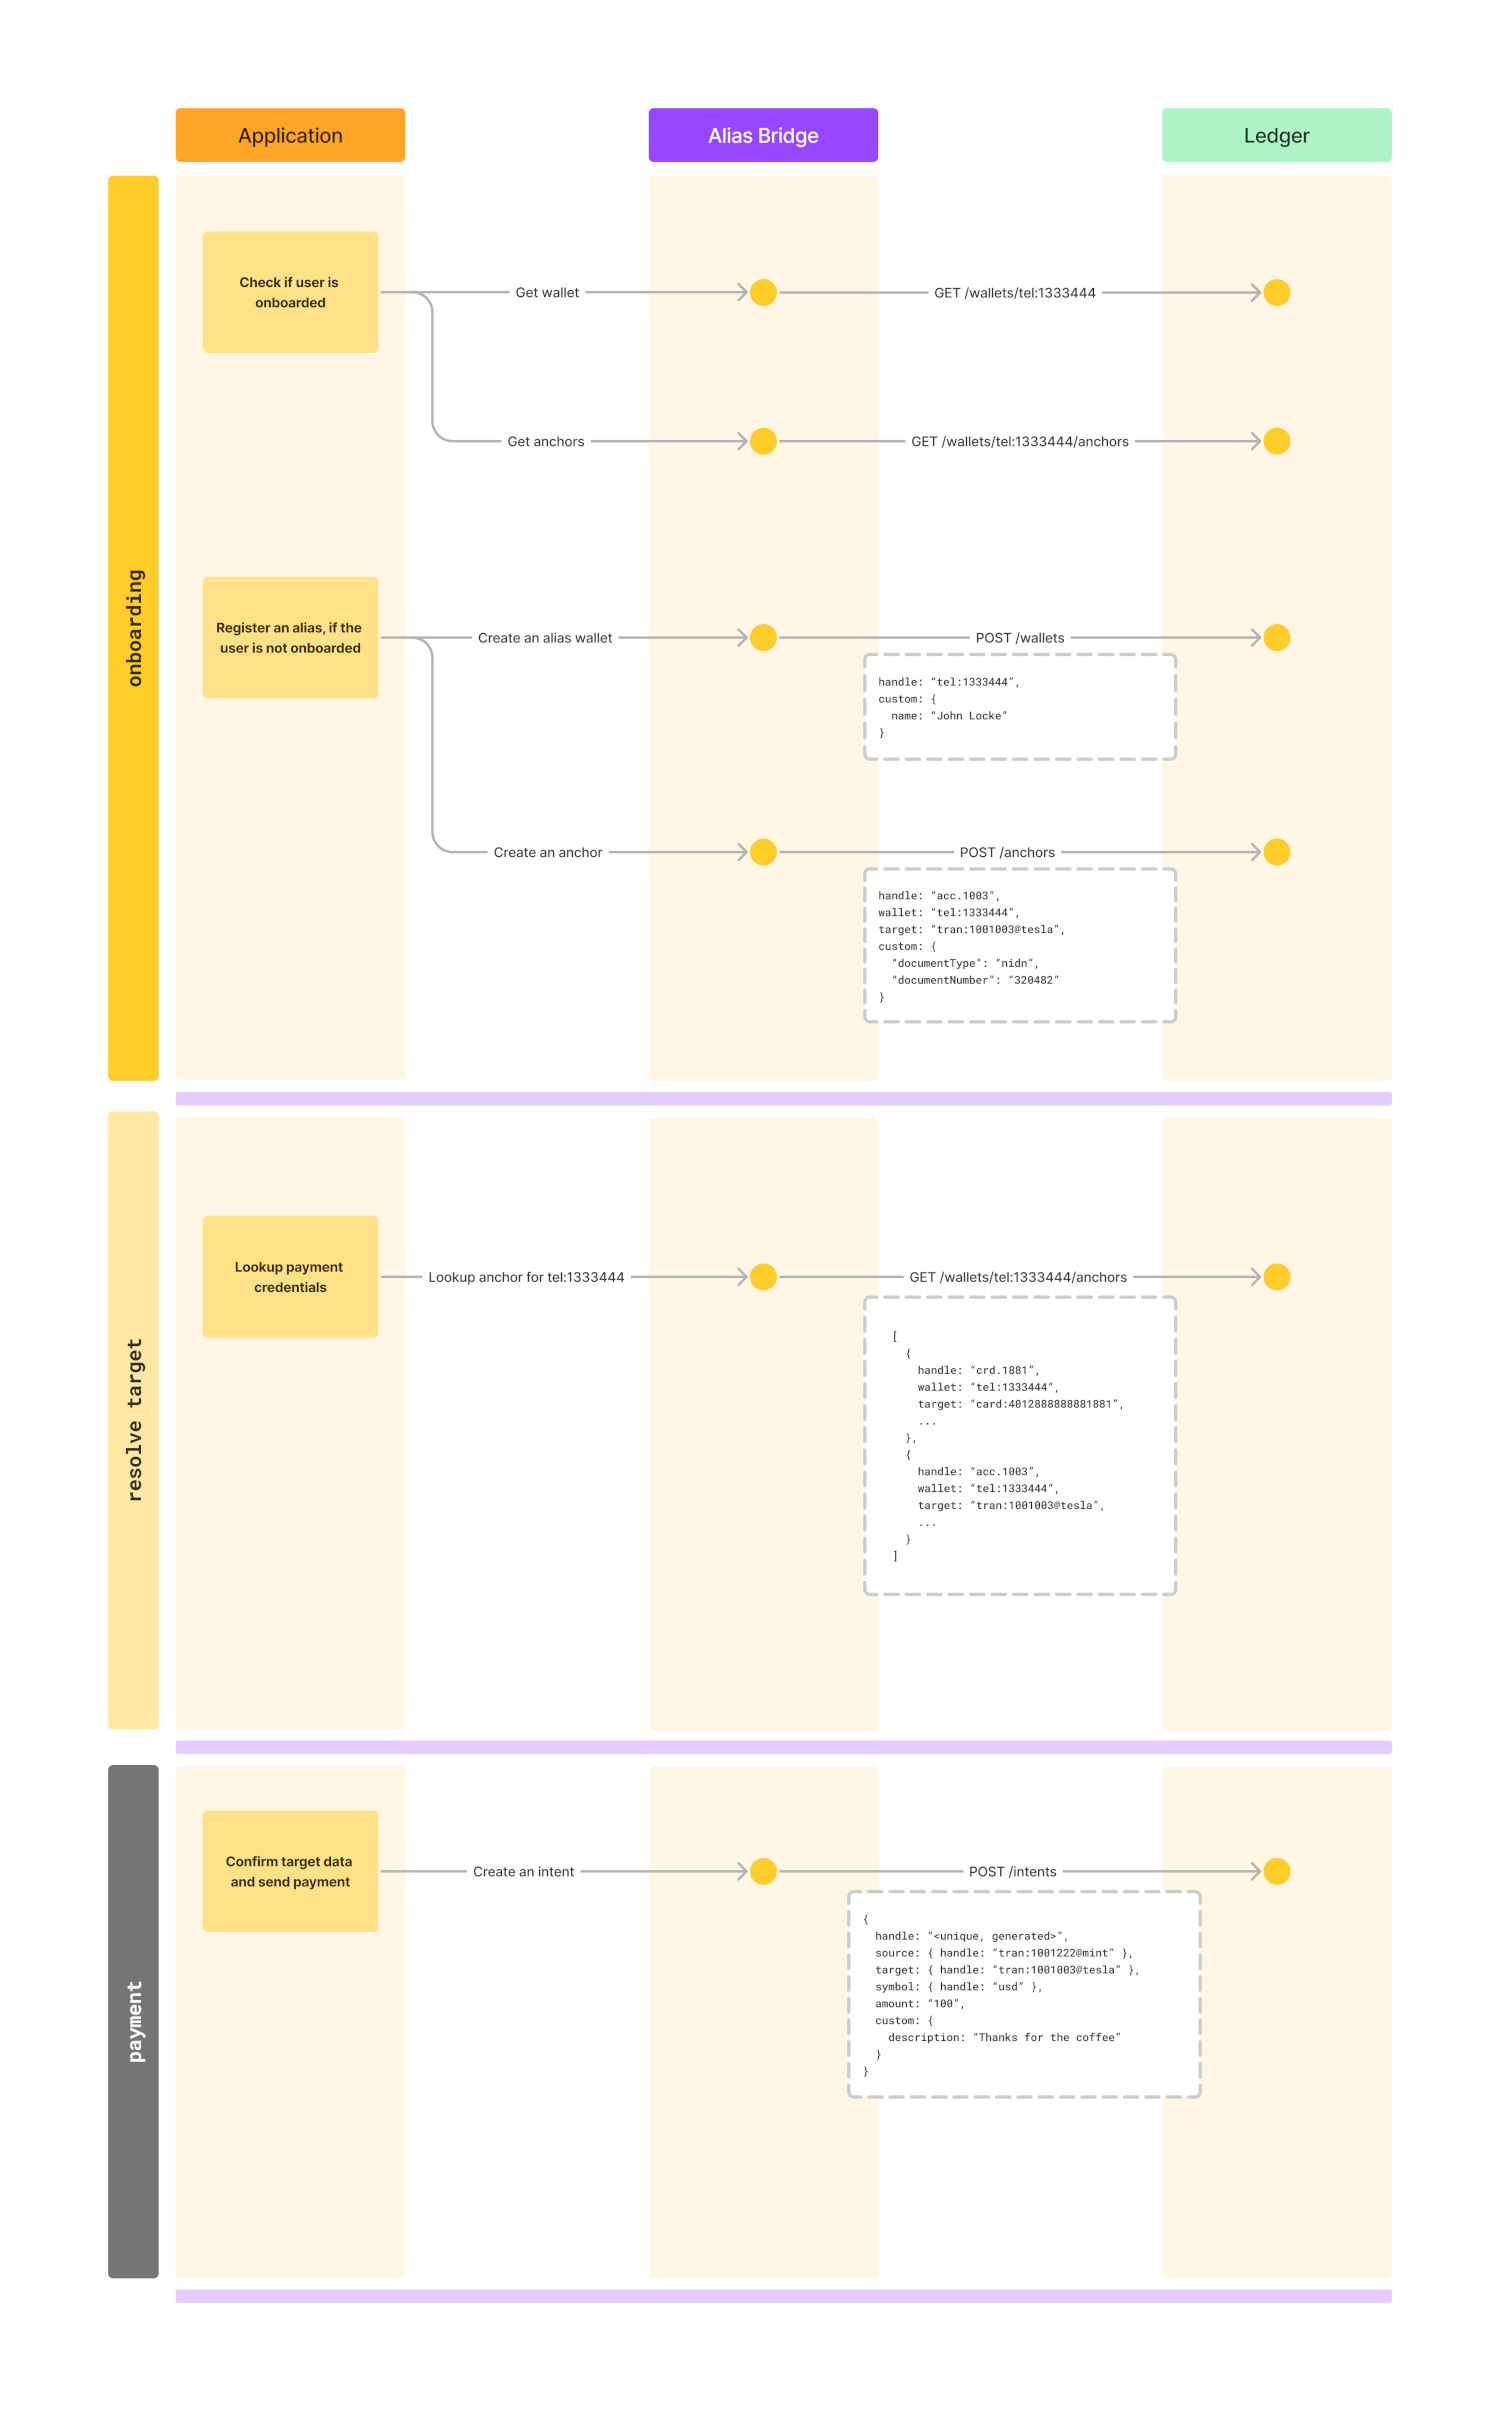
In the diagram, the last step is a payment which uses only accounts, the final payment doesn’t contain any mention of an alias. Payments are usually made using existing rails, that is why custom data is very useful for us here. It allows us to store any data required by existing systems during onboarding. That way users only need to remember an alias. They don’t have to enter or remember a lot of complicated fields like document numbers, addresses, etc.
With this we have a fully functional alias directory which supports different types of payment credentials. To make it production ready, we would only create schemas to enable strict field validations and configure stricter security rules.
Conclusion
In this tutorial we have demonstrated how to build alias directories of varying complexity using the ledger. We have started with a very simple system and expanded it over the course of the tutorial.
Ledger allows you to start with something very simple and introduce complexity as needed. We show that all of this can be done by maintaining compatibility for existing users and allowing them to adopt new features seamlessly, with minimal effort from their side.
This tutorial shows only successful flows, to learn more about building a production ready implementation which covers all the cases please see our how to guides and references on core ledger concepts.