Connecting to an alias directory
Introduction
In this tutorial we are going to see how to connect to an alias directory we have built in one of our previous tutorials. This tutorial involves writing code in order to integrate an existing system, for example a bank middleware, to the ledger.
In the ledger ecosystem all components that are used in order to adapt protocols and connect systems together are called bridges. In line with this naming, we are going to build an alias bridge in this tutorial.
This tutorial builds upon the things we did in Building an alias directory. We are going to connect to the alias directory we have built in that tutorial and use it to test our integration. It is very important to have that working, if you haven’t finished that tutorial, please go back and finish it before continuing.
Getting started
In order to simplify our integration as much as possible, we are going to build our bridge using the ledger-sdk in NodeJs. In order to follow this tutorial you have to have nodeJS v20 or newer installed on your machine. You can check the version of node you have installed by typing the following command in the terminal:
$ node -v
v20.17.0
It is possible to use any other programming language to connect to ledger, since the interface is a REST API and cryptography is based on well known algorithms which are widely supported. Using a programming language which doesn’t have a native ledger-sdk support would require us to write additional code to make ledger requests. The entire API is documented in our API docs and our how to guides explain additional details.
Discovering ledger requests using CLI
Minka CLI can be used to discover detailed information about API requests that it does in order to perform the commands we type into it. This feature can be very useful when debugging or trying to replicate a functionality we first tested using the CLI in code.
In this tutorial we will actually do this for the flows we have implementing using only CLI when initially setting up our alias.
We can discover API requests by using the CLI in verbose mode, by passing -v or --verbose to any of the commands we type. For example to see how a request to create a new alias wallet looks like we can use the following command:
$ minka wallet create -v
? Handle: tel:1333111
? Bridge: *[none]
?* Schema: *tel-alias*
? Add custom data? Yes
? Field class: string
? Field title: name
? Field value: James Ford
? Add another field: No
? Add routes: No
? Attach a policy? No
? Signer: admin

Request details:
POST https://ldg-stg.one/api/v2/wallets

Headers:
  - Accept: application/json, text/plain, */*
  - Content-Type: application/json
  - User-Agent: MinkaCLI/2.19.0 LedgerSDK/2.19.0
  - X-Ledger: <your_ledger>
  - Content-Length: 596
  - Accept-Encoding: gzip, compress, deflate, br

{
  "hash": "89bac1cb66cd1321061146838db1fa0551760af2662dbaa1b901ed58b837e74b",
  "data": {
    "handle": "tel:1333111",
    "schema": "tel-alias",
    "access": [
      {
        "action": "any",
        "signer": {
          "public": "vMSxaKnOxGUN0B8ovGTMOnGBkU6rD5hyvXfxDdjHV1k="
        }
      },
      {
        "action": "read",
        "bearer": {
          "$signer": {
            "public": "vMSxaKnOxGUN0B8ovGTMOnGBkU6rD5hyvXfxDdjHV1k="
          }
        }
      }
    ],
    "custom": {
      "name": "James Ford"
    }
  },
  "meta": {
    "proofs": [
      {
        "method": "ed25519-v2",
        "public": "vMSxaKnOxGUN0B8ovGTMOnGBkU6rD5hyvXfxDdjHV1k=",
        "digest": "e384f4d89bb27acc9754eddfad78cfc6fcbb2db45c05fc425a849bfefb06e711",
        "result": "N7OsF3FWJ+ZwvPTW3FU7KqciIy79BURSQ3Z97GN0UW+nuXv11Kcnx7zN86xfELdKUqGD/gqE8N/dvixMErx+Dw==",
        "custom": {
          "moment": "2023-12-05T12:13:10.236Z",
          "status": "created"
        }
      }
    ]
  }
}

Response details:
Status: 201 Created

Headers:
  - access-control-allow-origin: *
  - content-type: application/json; charset=utf-8
  - etag: W/"447-H4uOR9QJEGShCKvJydvFVfl4fkc"
  - x-cloud-trace-context: 469d17a5616885fa4a0eea22e5aa95f3
  - date: Thu, 16 Jan 2025 12:12:50 GMT
  - server: Google Frontend
  - content-length: 1095
  - via: 1.1 google
  - alt-svc: h3=":443"; ma=2592000,h3-29=":443"; ma=2592000

{
  "hash": "89bac1cb66cd1321061146838db1fa0551760af2662dbaa1b901ed58b837e74b",
  "data": {
    "handle": "tel:1333111",
    "custom": {
      "name": "James Ford"
    },
    "access": [
      {
        "action": "any",
        "signer": {
          "public": "vMSxaKnOxGUN0B8ovGTMOnGBkU6rD5hyvXfxDdjHV1k="
        }
      },
      {
        "action": "read",
        "bearer": {
          "$signer": {
            "public": "vMSxaKnOxGUN0B8ovGTMOnGBkU6rD5hyvXfxDdjHV1k="
          }
        }
      }
    ]
  },
  "luid": "$wlt.MxCFzR7pN9Tm7YDhy",
  "meta": {
    "proofs": [
      {
        "custom": {
          "moment": "2023-12-05T12:13:10.236Z",
          "status": "created"
        },
        "digest": "e384f4d89bb27acc9754eddfad78cfc6fcbb2db45c05fc425a849bfefb06e711",
        "method": "ed25519-v2",
        "public": "vMSxaKnOxGUN0B8ovGTMOnGBkU6rD5hyvXfxDdjHV1k=",
        "result": "N7OsF3FWJ+ZwvPTW3FU7KqciIy79BURSQ3Z97GN0UW+nuXv11Kcnx7zN86xfELdKUqGD/gqE8N/dvixMErx+Dw=="
      },
      {
        "custom": {
          "luid": "$wlt.MxCFzR7pN9Tm7YDhy"
        },
        "digest": "ed5a156f2f97f69fc8dbedb6a4d91ac69e5cb504b1fb7a4708043e19a6a309b1",
        "method": "ed25519-v2",
        "public": "JF5zbL7yoHilL4WZp9smiRFpN6vadsLNi70YWiPk+ug=",
        "result": "jWq8dlXJ0ltDQEYG7+VsZE4bI6eKNV2p7x375/aIFEwbAz+3mDAaLQLuj2kgWLYEKpVdekvGd2pAcBhTh7LYDQ=="
      }
    ],
    "moment": "2023-12-05T12:13:10.883Z",
    "creator": [
      "vMSxaKnOxGUN0B8ovGTMOnGBkU6rD5hyvXfxDdjHV1k="
    ]
  }
}

✅ Wallet created successfully:
Luid: $wlt.MxCFzR7pN9Tm7YDhy
Handle: tel:1333111
Signer: vMSxaKnOxGUN0B8ovGTMOnGBkU6rD5hyvXfxDdjHV1k= (admin)
Custom:
  - name: James Ford
As you can see above, the command prints the basic HTTP data and the full request body with headers. This can be very useful when debugging to help us identify issues by comparing requests from our integration and the ones CLI is making. This is particularly useful when building the complete integration, without using the ledger-sdk which handles most of these details.
Creating a project
We will start by creating an empty NodeJs project, we can do this by creating a new directory and running an npm init command in it:
$ mkdir alias-bridge
$ cd alias-bridge
$ npm init
This utility will walk you through creating a package.json file.
It only covers the most common items, and tries to guess sensible defaults.

See `npm help init` for definitive documentation on these fields
and exactly what they do.

Use `npm install <pkg>` afterwards to install a package and
save it as a dependency in the package.json file.

Press ^C at any time to quit.
package name: (alias-bridge)
version: (1.0.0)
description:
entry point: (index.js)
test command:
git repository:
keywords:
author:
license: (ISC)
You can accept default values for everything during this process.
Once we have done this, we have an empty node project, the next step is to install express because our project will expose several REST APIs to simulate common bank operations. We can install express using npm like this:
$ npm install express

added 62 packages, and audited 63 packages in 960ms

11 packages are looking for funding
  run `npm fund` for details

found 0 vulnerabilities
Now we can test if everything is setup correctly by creating a simple index.js with a hello world route:
const express = require('express')

const app = express()
app.use(express.json())
const port = 3000

app.get('/', (req, res) => {
  res.send('Alias bridge is running!')
})

app.listen(port, () => {
  console.log(`Alias bridge running on port ${port}`)
})
To test our code we need to start the app:
$ node index.js
Alias bridge running on port 3000
If we open localhost:3000 in a browser we should see that our default route is being called and the message we return there:
Alias bridge is running!Registering routes
The main purpose of our bridge is to provide APIs for internal banking systems, for example bank applications, in order to enable them to use an alias directory.
We need to create a backend component to protect ledger signing keys. The bridge validates the user by using existing security mechanisms like sessions, JWT tokens or similar and performs a ledger request only if the user has the required permissions.
Ledger keys should never be stored in applications distributed to users. If users recover those keys from the application, they would get direct access to the alias directory.
APIs exposed to internal systems can also be adapted by the bridge to make it easier to consume. In this tutorial we will only proxy ledger APIs from the bridge. This is best practice because it requires less work to add new features later and there is less concepts for developers to understand.
The only difference between ledger and bridge APIs is going to involve signatures. The application doesn’t have keys, so it will not sign the requests, instead the bridge will validate permissions and add a signature if everything is ok.
We have two concepts that we need to support for alias directory: wallets and anchors. We will register the following routes in our bridge to support these concepts:
- GET /wallets/:handle - get a wallet by handle (alias name)
- GET /wallets/:handle/anchors - get anchors for a wallet
- POST /wallets - create a new wallet
- POST /anchors - create a new anchor
We are going to show only these routes in this tutorial for simplicity, we can add other functionalities like updating and deleting records in the same way.
Let’s register a route to get a wallet in our project now. First we will create a new directory called routes to organize all routes in one place:
$ mkdir routesNext, we will create a new file in the routes directory, called wallet-get.js with a handler function that is going to run when this route is called. This file needs to export a handler function for the route. More info about routing in express can be found here:
We will start with a simple route handler for get wallets just to check that everything is wired up correctly. Later, we will replace this implementation as we start to develop the functionality. This is the initial version of the wallet-get.js:
module.exports = async (req, res) => {
  console.log(`Get wallet called for: ${req.params.handle}`)

  // Return response as json
  res.json({
    handle: req.params.handle
  })
}
Additionally, we need to register a route in the index.js, at the top of the file, we will require the handler, and add a route registration below:
const express = require('express')
const getWallet = require('./routes/wallet-get')

const app = express()
app.use(express.json())
const port = 3000

app.get('/', (req, res) => {
  res.send('Alias bridge is running!')
})

app.get('/wallets/:handle', getWallet)

app.listen(port, () => {
  console.log(`Alias bridge running on port ${port}`)
})
After making the above changes, we can test the new version:
$ node ./index.js
Alias bridge running on port 3000
To test the new route, we need make an HTTP request:
GET http://localhost:3000/wallets/tel:1333444and we should receive the following response:
{
  "handle": "tel:1333444"
}
We can make this request from a command line, by using a UI tool like postman or anything else that can make a simple HTTP request. Here is an example on how to make this request by using curl from the command line:
$ curl http://localhost:3000/wallets/tel:1333444

{
  "handle": "tel:1333444"
}
For POST routes we can slightly change the handler function to return a handle form the body:
module.exports = async (req, res) => {
  console.log(`Create wallet called`)

  // Return response as json
  res.json({
    handle: req.body.handle
  })
}
We can register this route in a similar way as the first one:
const express = require('express')
const getWallet = require('./routes/wallet-get')
const createWallet = require('./routes/wallet-create')

const app = express()
app.use(express.json())
const port = 3000

app.get('/', (req, res) => {
  res.send('Alias bridge is running!')
})

app.get('/wallets/:handle', getWallet)
app.post('/wallets', createWallet)

app.listen(port, () => {
  console.log(`Alias bridge running on port ${port}`)
})
To test it we can also use curl:
curl -X POST -H "Content-Type: application/json" -d '{"handle":"tel:1222333"}' \
http://localhost:3000/wallets

{
  "handle": "tel:1222333"
}
You need to restart your server after each modification to see the changes.
We can now repeat the same process for the remaining 3 routes. After we added all the routes our index.js should look like this:
const express = require('express')
const getWallet = require('./routes/wallet-get')
const getWalletAnchors = require('./routes/wallet-anchors-get')
const createWallet = require('./routes/wallet-create')
const createAnchor = require('./routes/anchor-create')

const app = express()
app.use(express.json())
const port = 3000

app.get('/', (req, res) => {
  res.send('Alias bridge is running!')
})

app.get('/wallets/:handle', getWallet)
app.get('/wallets/:handle/anchors', getWalletAnchors)
app.post('/wallets', createWallet)
app.post('/anchors', createAnchor)

app.listen(port, () => {
  console.log(`Alias bridge running on port ${port}`)
})
Querying aliases
No we can start implementing our bridge handlers in order to connect to the alias. The first use case we are going to look at is how can we check if an alias is already registered. The general onboarding flow is shown below, in this chapter we are going to support the first use case, getting wallets and anchors.

We will use a ledger-sdk to interact with the ledger. This is a package published on npm, we can install it in our project like this:
$ npm install @minka/ledger-sdk

added 18 packages, and audited 81 packages in 9s

15 packages are looking for funding
  run `npm fund` for details

found 0 vulnerabilities
To learn how to do most common operations using the SDK, see the SDK Cheat Sheet section in our documentation.
It is necessary to configure the ledger-sdk before using it. We need to provide the information about our ledger, where is it hosted and keys which will be used to sign requests. All the data we need can be retrieved from the ledger using the CLI tool. To reuse this config, we can create a new file in our project that is going to setup our ledger-sdk instance and all other parts of the code can import from that file. We can do this by creating a new file called ledger.js in the root of our project:
const { LedgerSdk } = require('@minka/ledger-sdk')

// Key pair to use to generate ledger JWT tokens and sign requests
// which go to the ledger. This is our admin signer from CLI,
// find it with: 'cat ~/.minka/signers.json' and then do
// 'minka signer show -s admin' to get decrypted private key
const ADMIN_KEY_PAIR = {
    format: 'ed25519-raw',
    public: 'vMSxaKnOxGUN0B8ovGTMOnGBkU6rD5hyvXfxDdjHV1k=',
    secret: 'gEDoOsW7UWdzAO5jKfEsttS7bgLGELgYuJGgJfa2Nn4='
}

const ledger = new LedgerSdk({
    // Server URL, find it with: minka server show
    server: 'https://ldg-stg.one/api/v2',
    // Ledger handle, find it with: minka ledger show
    ledger: 'zr',

    // Verify that responses have been signed by the ledger
    signer: {
        // The signer to verify responses
        // Ledger uses the system signer to sign responses,
        // find it with: minka signer show system
        format: 'ed25519-raw',
        public: 'JF5zbL7yoHilL4WZp9smiRFpN6vadsLNi70YWiPk+ug=',
    },

    secure: {
        iss: 'vMSxaKnOxGUN0B8ovGTMOnGBkU6rD5hyvXfxDdjHV1k=',
        aud: 'zr',
        sub: 'signer:vMSxaKnOxGUN0B8ovGTMOnGBkU6rD5hyvXfxDdjHV1k=',
        exp: 60, // seconds
        keyPair: ADMIN_KEY_PAIR,
    }
})

module.exports = { ledger, ADMIN_KEY_PAIR }
Most of the data configured here is related to security. Ledger has several security mechanisms based on asymmetric cryptography and the SDK can handle all of this for us transparently.
The values included here are examples, replace the keys and URLs with the values from your environment.
With the SDK configured, we can now start using it in our get wallet handler:
const { ledger } = require('../ledger')

module.exports = async (req, res) => {
  console.log(`Get wallet called for: ${req.params.handle}`)

  try {
    // Get the wallet from ledger
    const { wallet } = await ledger.wallet.read(req.params.handle)

    // Return response as json
    res.json(wallet)
  } catch (error) {
    // We are just returning the error here to simplify the code,
    // for production, we would sanitize error info before returning
    res.status(400).json(error)
  }
}
Getting a wallet from ledger is just one line of code plus some error handling. Our implementation here just proxies the request to ledger and returns the response to the user.
We can test this by restarting our server and getting a wallet we created in our first tutorial through curl or our browser:
GET http://localhost:3000/wallets/tel:1333444We should get the following response:
{
  "handle": "tel:1333444",
  "custom": {
    "name": "John Locke"
  },
  "access": [
    {
      "action": "any",
      "signer": {
        "public": "vMSxaKnOxGUN0B8ovGTMOnGBkU6rD5hyvXfxDdjHV1k="
      }
    },
    {
      "action": "read",
      "bearer": {
        "$signer": {
          "public": "vMSxaKnOxGUN0B8ovGTMOnGBkU6rD5hyvXfxDdjHV1k="
        }
      }
    }
  ]
}
With only a few lines of code we are able to query wallets from our ledger. Let’s now add support for getting anchors as well, this is even much simpler since our SDK is already in place. We only need to update our handler:
const { ledger } = require('../ledger')

module.exports = async (req, res) => {
  console.log(`Get wallet anchors called for: ${req.params.handle}`)

  try {
    // Get wallet anchors from ledger
    const { anchors } = await ledger.wallet.getAnchors(req.params.handle)

    // Return response as json
    res.json(anchors)
  } catch (error) {
    // We are just returning the error here to simplify the code,
    // for production, we would sanitize error info before returning
    res.status(400).json(error)
  }
}
We can test this change the same way as we did the last one:
GET http://localhost:3000/wallets/tel:1333444/anchorsWe should get the following response:
[
  {
    "handle": "crd.1881",
    "wallet": "tel:1333444",
    "target": "card:4012888888881881@visa",
    "custom": {
      "cvv": "204",
      "expiry": "01/28"
    },
    "access": [
      {
        "action": "any",
        "signer": {
          "public": "vMSxaKnOxGUN0B8ovGTMOnGBkU6rD5hyvXfxDdjHV1k="
        }
      },
      {
        "action": "read",
        "bearer": {
          "$signer": {
            "public": "vMSxaKnOxGUN0B8ovGTMOnGBkU6rD5hyvXfxDdjHV1k="
          }
        }
      }
    ]
  },
  {
    "handle": "acc.1003",
    "wallet": "tel:1333444",
    "target": "tran:1001003@tesla",
    "custom": {
      "documentType": "nidn",
      "documentNumber": "320482"
    },
    "access": [
      {
        "action": "any",
        "signer": {
          "public": "vMSxaKnOxGUN0B8ovGTMOnGBkU6rD5hyvXfxDdjHV1k="
        }
      },
      {
        "action": "read",
        "bearer": {
          "$signer": {
            "public": "vMSxaKnOxGUN0B8ovGTMOnGBkU6rD5hyvXfxDdjHV1k="
          }
        }
      }
    ]
  }
]
As you can see we are getting back our data from the first tutorial, and we can now start exposing it to our existing services and users. Our services would get wallets and anchors from ledger in order to decide if user is already onboarded or if we need to onboard the user to the service.
User is onboarded if both wallet and anchor exist in the ledger.
We have mentioned in the beginning of this tutorial that one of the main goals of this bridge is to protect the signing keys from ledger, but still didn’t implement any additional security in our service, everything is completely public. In the next chapter we will show how to protect our APIs.
Securing the bridge
There are many ways to protect the endpoints we defined on the bridge, for example OAuth, API keys, mTLS, session tokens, signing message payloads, etc. The decision regarding this is completely on the institution which is implementing and deploying the bridge. In this tutorial we will demonstrate how to protect the service using JWT bearer tokens, which are often the most common way to secure API endpoints.
To validate JWTs we will use a library called jsonwebtoken, we can install it in our project like this:
$ npm install jsonwebtoken

added 16 packages, and audited 97 packages in 5s

15 packages are looking for funding
  run `npm fund` for details

found 0 vulnerabilities
NodeJs has a concept of middleware functions, those functions can be registered to run before any request handler and can abort the processing of a request. We will implement our verify-token middleware that is going to check the JWT and allow that request processing continues only if the token is valid.
To do this, we will first create a new file (verify-token.js) in the root of our project:
const jwt = require('jsonwebtoken')

// Default secret from jwt.io
const TOKEN_SECRET = 'your-256-bit-secret'

module.exports = (req, res, next) => {
  try {
    const authHeader = req.headers['authorization']
    console.log(`Verifying auth header: ${authHeader}`)

    // Parse the token from the Authorization header
    // Authorization header has a value of `Bearer <token>`
    // so we split by space and take the second part as token
    const token = authHeader && authHeader.split(' ')[1]
    if (!token) {
      // Token not found, return Unauthorized
      res.sendStatus(401)
      return
    }

    // This function will throw an error in case the token is not valid
    jwt.verify(token, TOKEN_SECRET, { algorithms: ['HS256'] })

    // Call to next() will continue processing the request,
    // we call it only if the token is valid
    next()
  } catch (error) {
    console.log(`Error while validating token: ${error.message}`)
    // Token not valid, return Forbidden
    res.sendStatus(403)
  }
}
This is a basic example of how we can verify JWT tokens. For production, we would properly handle secrets and additional checks and implement a more robust error handling, but the general principle remains the same.
To enable this middleware we need to register it in our index.js:
const express = require('express')
const verifyToken = require('./verify-token')
const getWallet = require('./routes/wallet-get')
const getWalletAnchors = require('./routes/wallet-anchors-get')
const createWallet = require('./routes/wallet-create')
const createAnchor = require('./routes/anchor-create')

const app = express()
app.use(express.json())
app.use(verifyToken)
const port = 3000

app.get('/', (req, res) => {
  res.send('Alias bridge is running!')
})

app.get('/wallets/:handle', getWallet)
app.get('/wallets/:handle/anchors', getWalletAnchors)
app.post('/wallets', createWallet)
app.post('/anchors', createAnchor)

app.listen(port, () => {
  console.log(`Alias bridge running on port ${port}`)
})
After this is done, we can restart our server and try to repeat one of our requests from before. We should get Unauthorized now, since we are not sending any tokens, for example:
$ curl http://localhost:3000/wallets/tel:1333444

Unauthorized
If we send an invalid token:
$ curl -H 'Authorization: Bearer xxx' http://localhost:3000/wallets/tel:1333444

Forbidden
The algorithm and secret we used in our code are the default from jwt.io website, so we can take a JWT from that site to test a valid token:
$ curl -H 'Authorization: Bearer eyJhbGciOiJIUzI1NiIsInR5cCI6IkpXVCJ9.eyJzdWIiOiIxMjM0NTY3ODkwIiwibmFtZSI6IkpvaG4gRG9lIiwiaWF0IjoxNTE2MjM5MDIyfQ.SflKxwRJSMeKKF2QT4fwpMeJf36POk6yJV_adQssw5c' \
http://localhost:3000/wallets/tel:1333444

{
  "handle": "tel:1333444",
  "custom": {
    "name": "John Locke"
  },
  "access": [
    {
      "action": "any",
      "signer": {
        "public": "vMSxaKnOxGUN0B8ovGTMOnGBkU6rD5hyvXfxDdjHV1k="
      }
    },
    {
      "action": "read",
      "bearer": {
        "$signer": {
          "public": "vMSxaKnOxGUN0B8ovGTMOnGBkU6rD5hyvXfxDdjHV1k="
        }
      }
    }
  ]
}
Now we have secured our bridge and only requests with valid tokens are going to be processed. The bridge holds the signing keys of the ledger, so we can limit the exposure of leaked tokens by using a short expiration time in our JWT tokens.
The last part that we need to cover is creating wallets and anchors. Those requests are very similar to the ones we did for reading data from the wallet, we will implement those in the next chapter.
Creating aliases
Let’s look at our onboarding flow once again to review what we have until now and what is next.
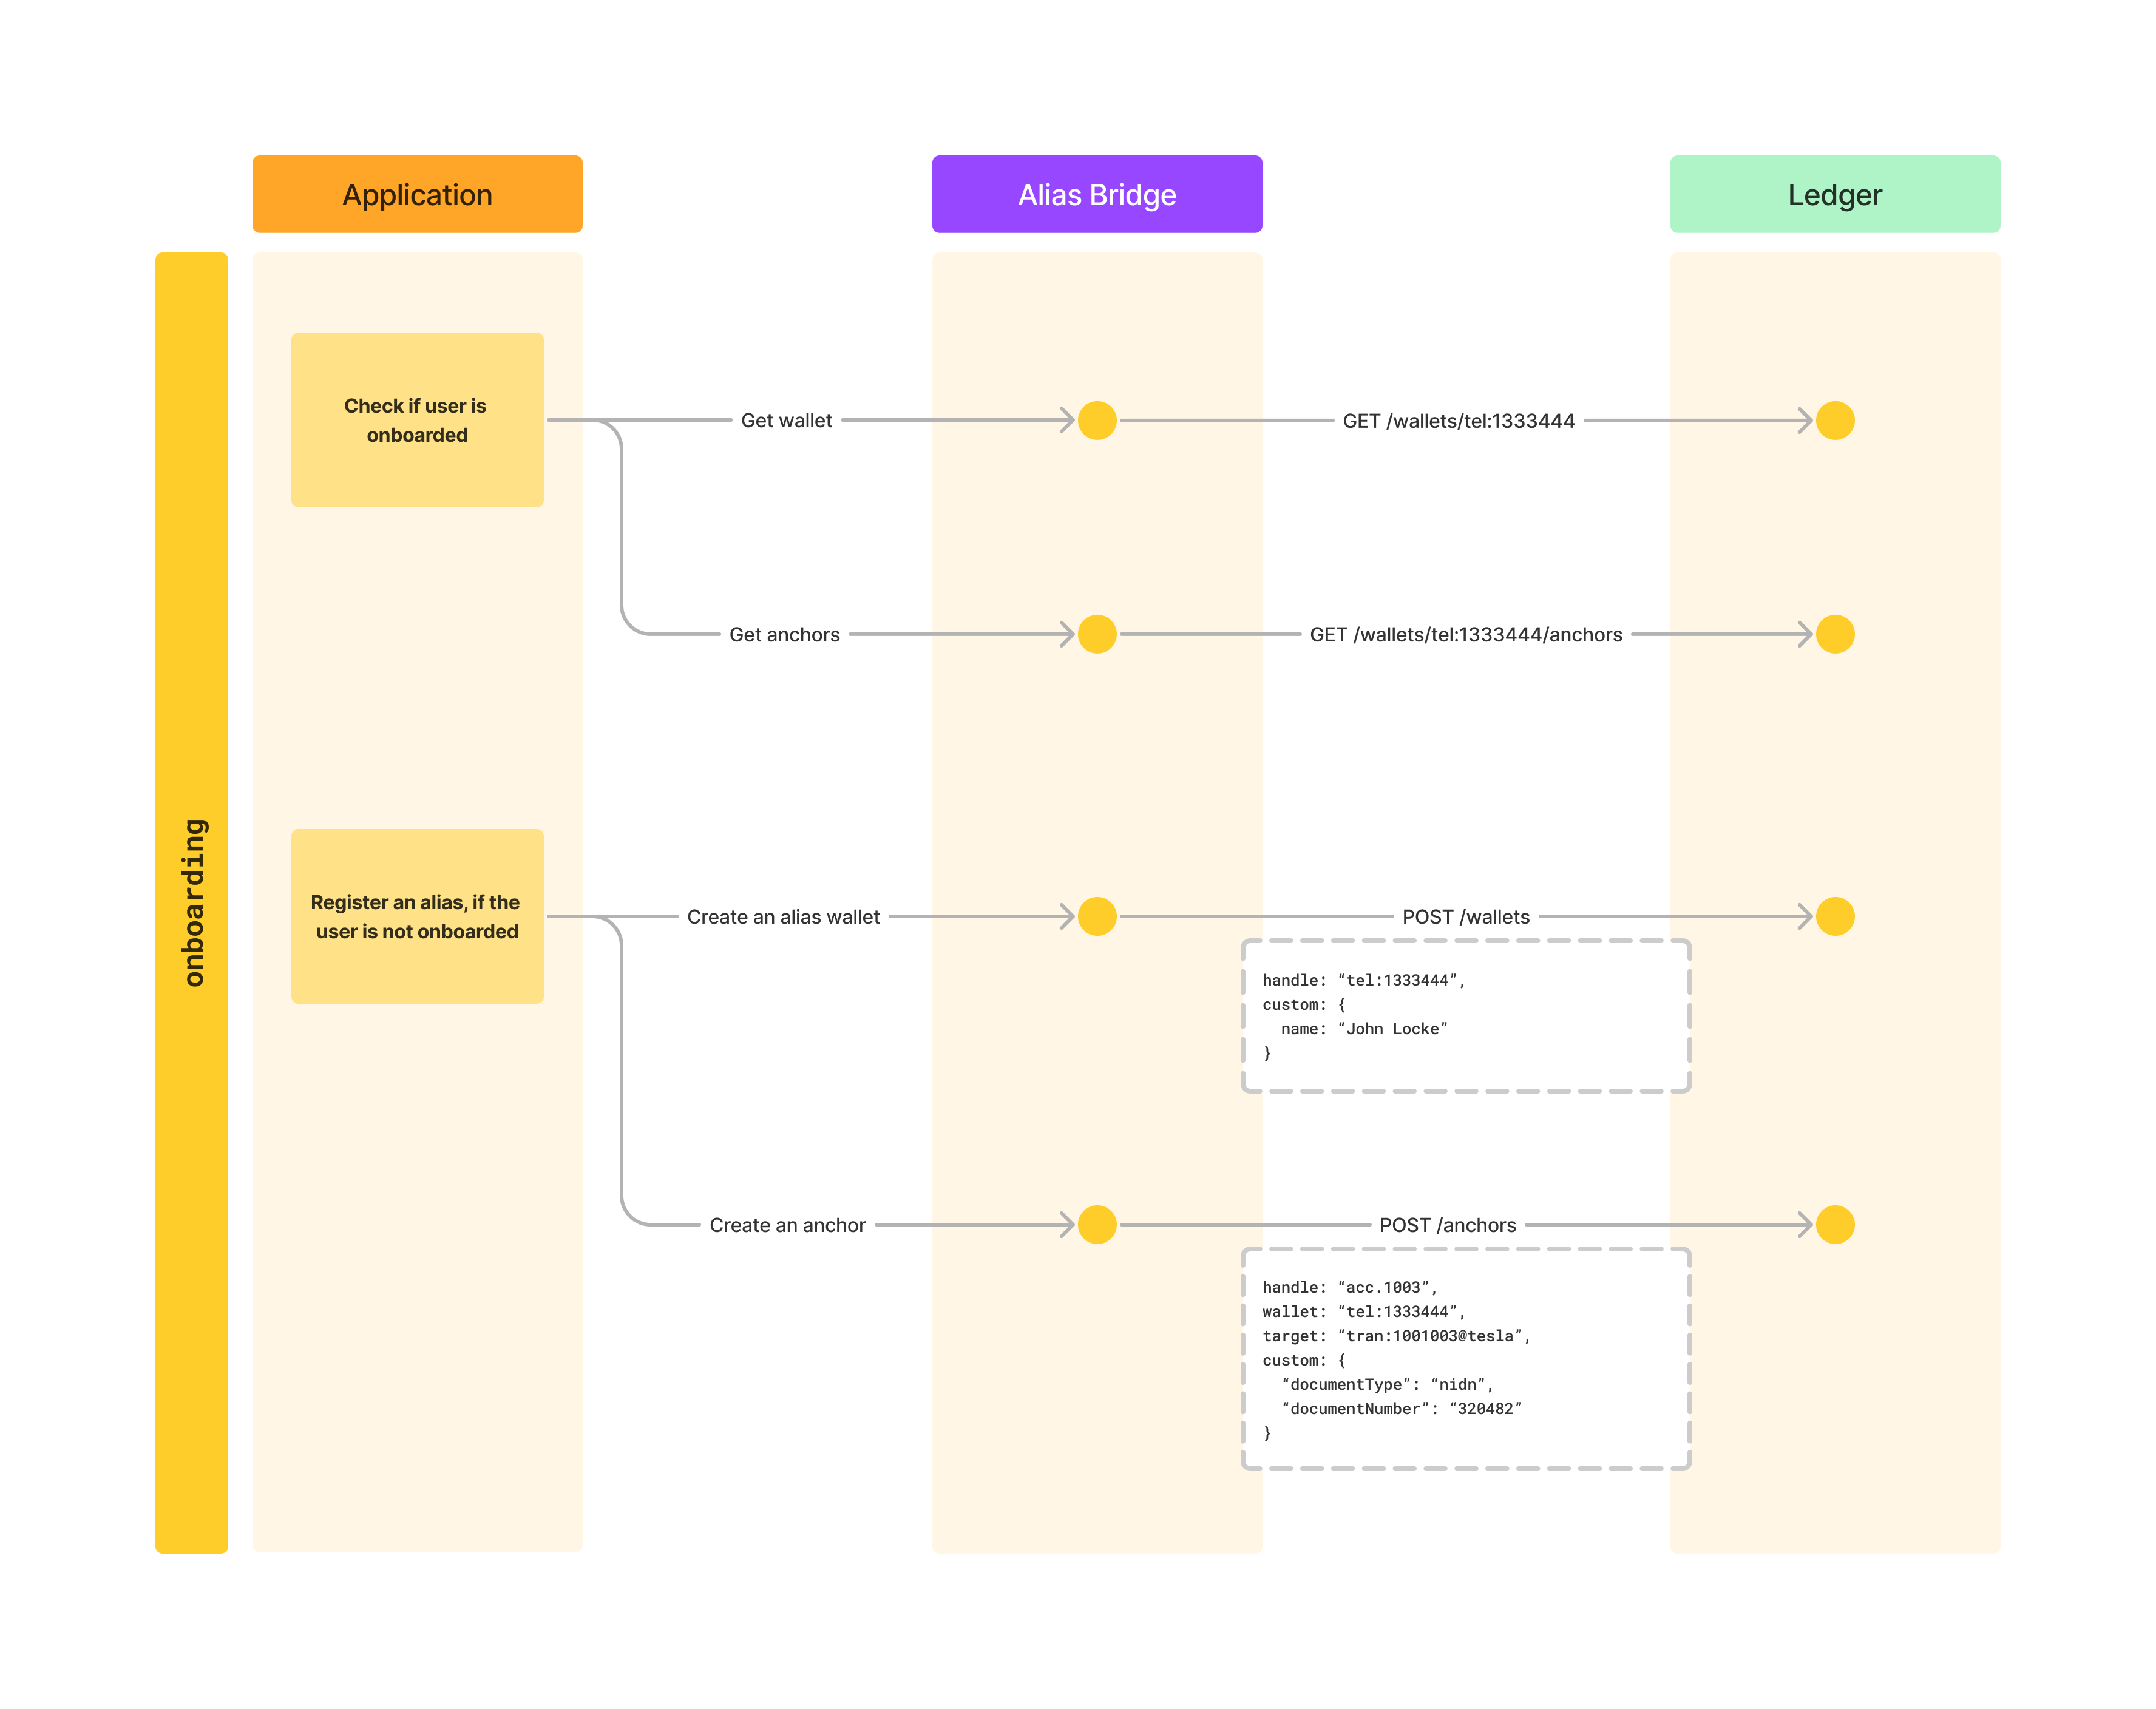
During onboarding, we first check if the wallet and anchors exist. If we don’t find this data for a user we would onboard this user by creating a wallet (alias) and an anchor (payment credential). In this chapter we are going to see how to create those records using the ledger-sdk.
First we will update our wallet-create route with the code that creates a wallet in the ledger:
const { ledger, ADMIN_KEY_PAIR } = require('../ledger')

module.exports = async (req, res) => {
  try {
    console.log(`Create wallet called`)

    const { wallet } = await ledger.wallet.init()
      .data({
        // Use the received body as the primary payload
        // there is no need for any special validations here,
        // since schemas can be configured on the ledger side
        // which will make sure that all data is validated
        ...req.body,
        // Configure access rules for admin by default
        access: [
          {
            action: 'any',
            signer: {
              public: ADMIN_KEY_PAIR.public
            }
          },
          {
            action: 'read',
            bearer: {
              $signer: {
                public: ADMIN_KEY_PAIR.public
              }
            }
          }
        ]
      })
      .hash()
      // Sign this request with our admin key pair
      .sign([{ keyPair: ADMIN_KEY_PAIR }])
      .send()

    // Return response as json
    res.json(wallet)
  } catch (error) {
    // We are just returning the error here to simplify the code,
    // for production, we would sanitize error info before returning
    res.status(400).json(error)
  }
}
This request is similar to the ones we did before, but it is a bit more complex since it requires us to provide data that is going to be sent to the ledger and sign the request with our key. The most complex part here are security rules, we wanted to configure that only the admin key can manage this record, so we set the security rules on top of the data we receive to our API. That remove the need for external users to handle this, they just send the primary data and everything else that is required is added by our bridge.
We can create a wallet using curl to test this API now:
$ curl -X POST \
-H 'Authorization: Bearer eyJhbGciOiJIUzI1NiIsInR5cCI6IkpXVCJ9.eyJzdWIiOiIxMjM0NTY3ODkwIiwibmFtZSI6IkpvaG4gRG9lIiwiaWF0IjoxNTE2MjM5MDIyfQ.SflKxwRJSMeKKF2QT4fwpMeJf36POk6yJV_adQssw5c' \
-H 'Content-Type: application/json' \
-d '{"handle":"tel:1222999", "schema":"tel-alias", "custom":{"name":"Kate Austen"}}' \
http://localhost:3000/wallets

{
  "handle": "tel:1222999",
  "custom": {
    "name": "Kate Austen"
  },
  "access": [
    {
      "action": "any",
      "signer": {
        "public": "vMSxaKnOxGUN0B8ovGTMOnGBkU6rD5hyvXfxDdjHV1k="
      }
    },
    {
      "action": "read",
      "bearer": {
        "$signer": {
          "public": "vMSxaKnOxGUN0B8ovGTMOnGBkU6rD5hyvXfxDdjHV1k="
        }
      }
    }
  ]
}
The response we get back is the wallet from the ledger.
Creating anchors is almost identical, we just need to change the call in SDK to use anchor instead of wallet:
const { ledger, ADMIN_KEY_PAIR } = require('../ledger')

module.exports = async (req, res) => {
  try {
    console.log(`Create anchor called`)

    const { anchor } = await ledger.anchor.init()
      .data({
        // Use the received body as the primary payload
        // there is no need for any special validations here,
        // since schemas can be configured on the ledger side
        // which will make sure that all data is validated
        ...req.body,
        // Configure access rules for admin by default
        access: [
          {
            action: 'any',
            signer: {
              public: ADMIN_KEY_PAIR.public
            }
          },
          {
            action: 'read',
            bearer: {
              $signer: {
                public: ADMIN_KEY_PAIR.public
              }
            }
          }
        ]
      })
      .hash()
      // Sign this request with our admin key pair
      .sign([{ keyPair: ADMIN_KEY_PAIR }])
      .send()

    // Return response as json
    res.json(anchor)
  } catch (error) {
    // We are just returning the error here to simplify the code,
    // for production, we would sanitize error info before returning
    res.status(400).json(error)
  }
}
And we can test it the same way as wallet creation:
$ curl -X POST \
-H 'Authorization: Bearer eyJhbGciOiJIUzI1NiIsInR5cCI6IkpXVCJ9.eyJzdWIiOiIxMjM0NTY3ODkwIiwibmFtZSI6IkpvaG4gRG9lIiwiaWF0IjoxNTE2MjM5MDIyfQ.SflKxwRJSMeKKF2QT4fwpMeJf36POk6yJV_adQssw5c' -H 'Content-Type: application/json' \
-d '{"handle":"acc.9008","wallet":"tel:1222999","target":"tran:1009008@tesla","custom":{"documentType":"nidn","documentNumber":"792720"}}' \
http://localhost:3000/anchors

{
  "handle": "acc.9008",
  "wallet": "tel:1222999",
  "target": "tran:1009008@tesla",
  "custom": {
    "documentType": "nidn",
    "documentNumber": "792720"
  },
  "access": [
    {
      "action": "any",
      "signer": {
        "public": "vMSxaKnOxGUN0B8ovGTMOnGBkU6rD5hyvXfxDdjHV1k="
      }
    },
    {
      "action": "read",
      "bearer": {
        "$signer": {
          "public": "vMSxaKnOxGUN0B8ovGTMOnGBkU6rD5hyvXfxDdjHV1k="
        }
      }
    }
  ]
}
With this API in place, we have covered everything we need for all the flows from the first tutorial. Until now we have been mostly focused on onboarding, but with the APIs we have built we can also support alias resolution. In the next chapter we will go through the remaining flows to see how to use our newly built APIs to resolve aliases.
Resolving payment data
To resolve the data required for a payment, we need to query our alias directory. For our use case, it is enough to only get anchors of a wallet. Anchors represent payment credentials and contain all the information we need in order to make a payment.
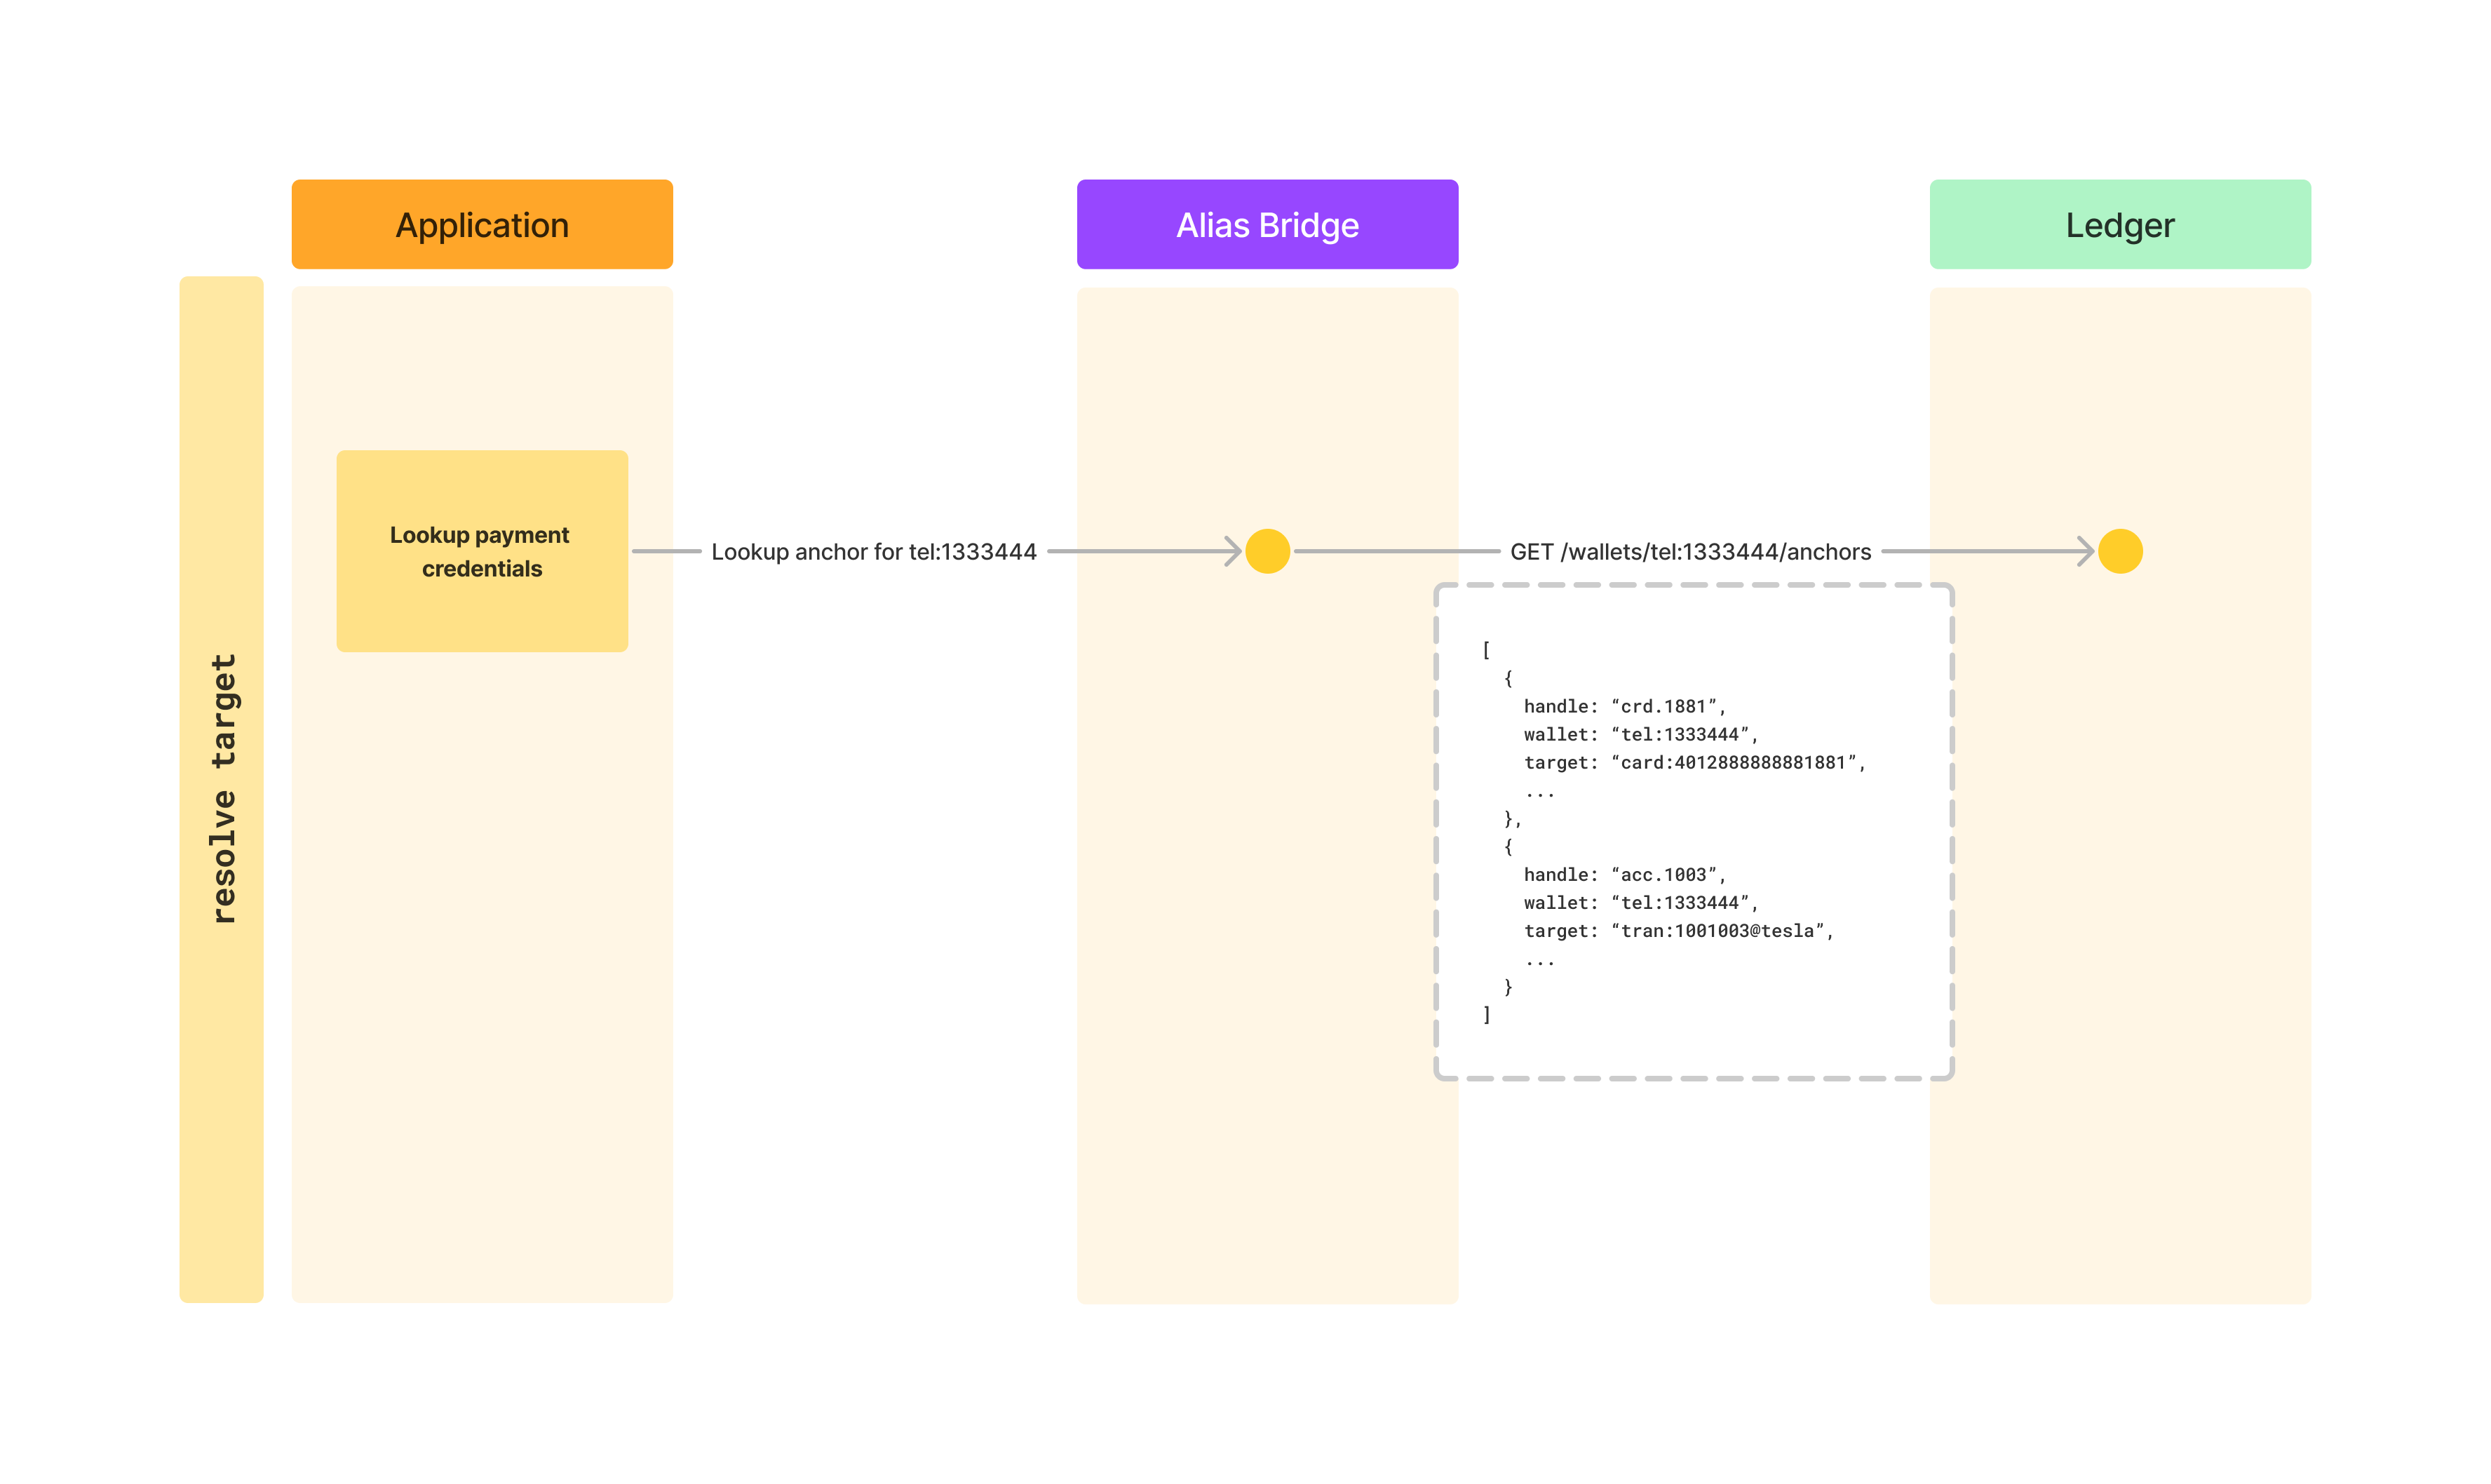
We can see how a request to resolve a payment target looks like in the diagram above. Based on this, we have already implemented an API that does this, so we only need to call it:
$ curl -H 'Authorization: Bearer eyJhbGciOiJIUzI1NiIsInR5cCI6IkpXVCJ9.eyJzdWIiOiIxMjM0NTY3ODkwIiwibmFtZSI6IkpvaG4gRG9lIiwiaWF0IjoxNTE2MjM5MDIyfQ.SflKxwRJSMeKKF2QT4fwpMeJf36POk6yJV_adQssw5c' \
http://localhost:3000/wallets/tel:1333444/anchors

[
  {
    "handle": "crd.1881",
    "wallet": "tel:1333444",
    "target": "card:4012888888881881@visa",
    "custom": {
      "cvv": "204",
      "expiry": "01/28"
    },
    "access": [
      {
        "action": "any",
        "signer": {
          "public": "vMSxaKnOxGUN0B8ovGTMOnGBkU6rD5hyvXfxDdjHV1k="
        }
      },
      {
        "action": "read",
        "bearer": {
          "$signer": {
            "public": "vMSxaKnOxGUN0B8ovGTMOnGBkU6rD5hyvXfxDdjHV1k="
          }
        }
      }
    ]
  },
  {
    "handle": "acc.1003",
    "wallet": "tel:1333444",
    "target": "tran:1001003@tesla",
    "custom": {
      "documentType": "nidn",
      "documentNumber": "320482"
    },
    "access": [
      {
        "action": "any",
        "signer": {
          "public": "vMSxaKnOxGUN0B8ovGTMOnGBkU6rD5hyvXfxDdjHV1k="
        }
      },
      {
        "action": "read",
        "bearer": {
          "$signer": {
            "public": "vMSxaKnOxGUN0B8ovGTMOnGBkU6rD5hyvXfxDdjHV1k="
          }
        }
      }
    ]
  }
]
After getting this data, our application would display the options to user, we would usually mask the payment credential data, just show the name of the banks or type of a card. We could do this in our alias bridge as well, before returning the data. This behavior depends on who is consuming the data from the bridge, if it is another backend service or an application, etc. and we will not cover it as part of this tutorial.
After selecting the payment credential, the user would make a payment using the data from that payment credential. We will show an example of this in the next chapter.
Before that, let’s see what happens if we try to query an alias that doesn’t exist:
$ curl -H 'Authorization: Bearer eyJhbGciOiJIUzI1NiIsInR5cCI6IkpXVCJ9.eyJzdWIiOiIxMjM0NTY3ODkwIiwibmFtZSI6IkpvaG4gRG9lIiwiaWF0IjoxNTE2MjM5MDIyfQ.SflKxwRJSMeKKF2QT4fwpMeJf36POk6yJV_adQssw5c' \
http://localhost:3000/wallets/tel:1333445/anchors

[]
As you can see, in this case we get an empty array as a result. In this case we would ask the user to select a different alias, since this one doesn’t have any payment credentials for payments registered.
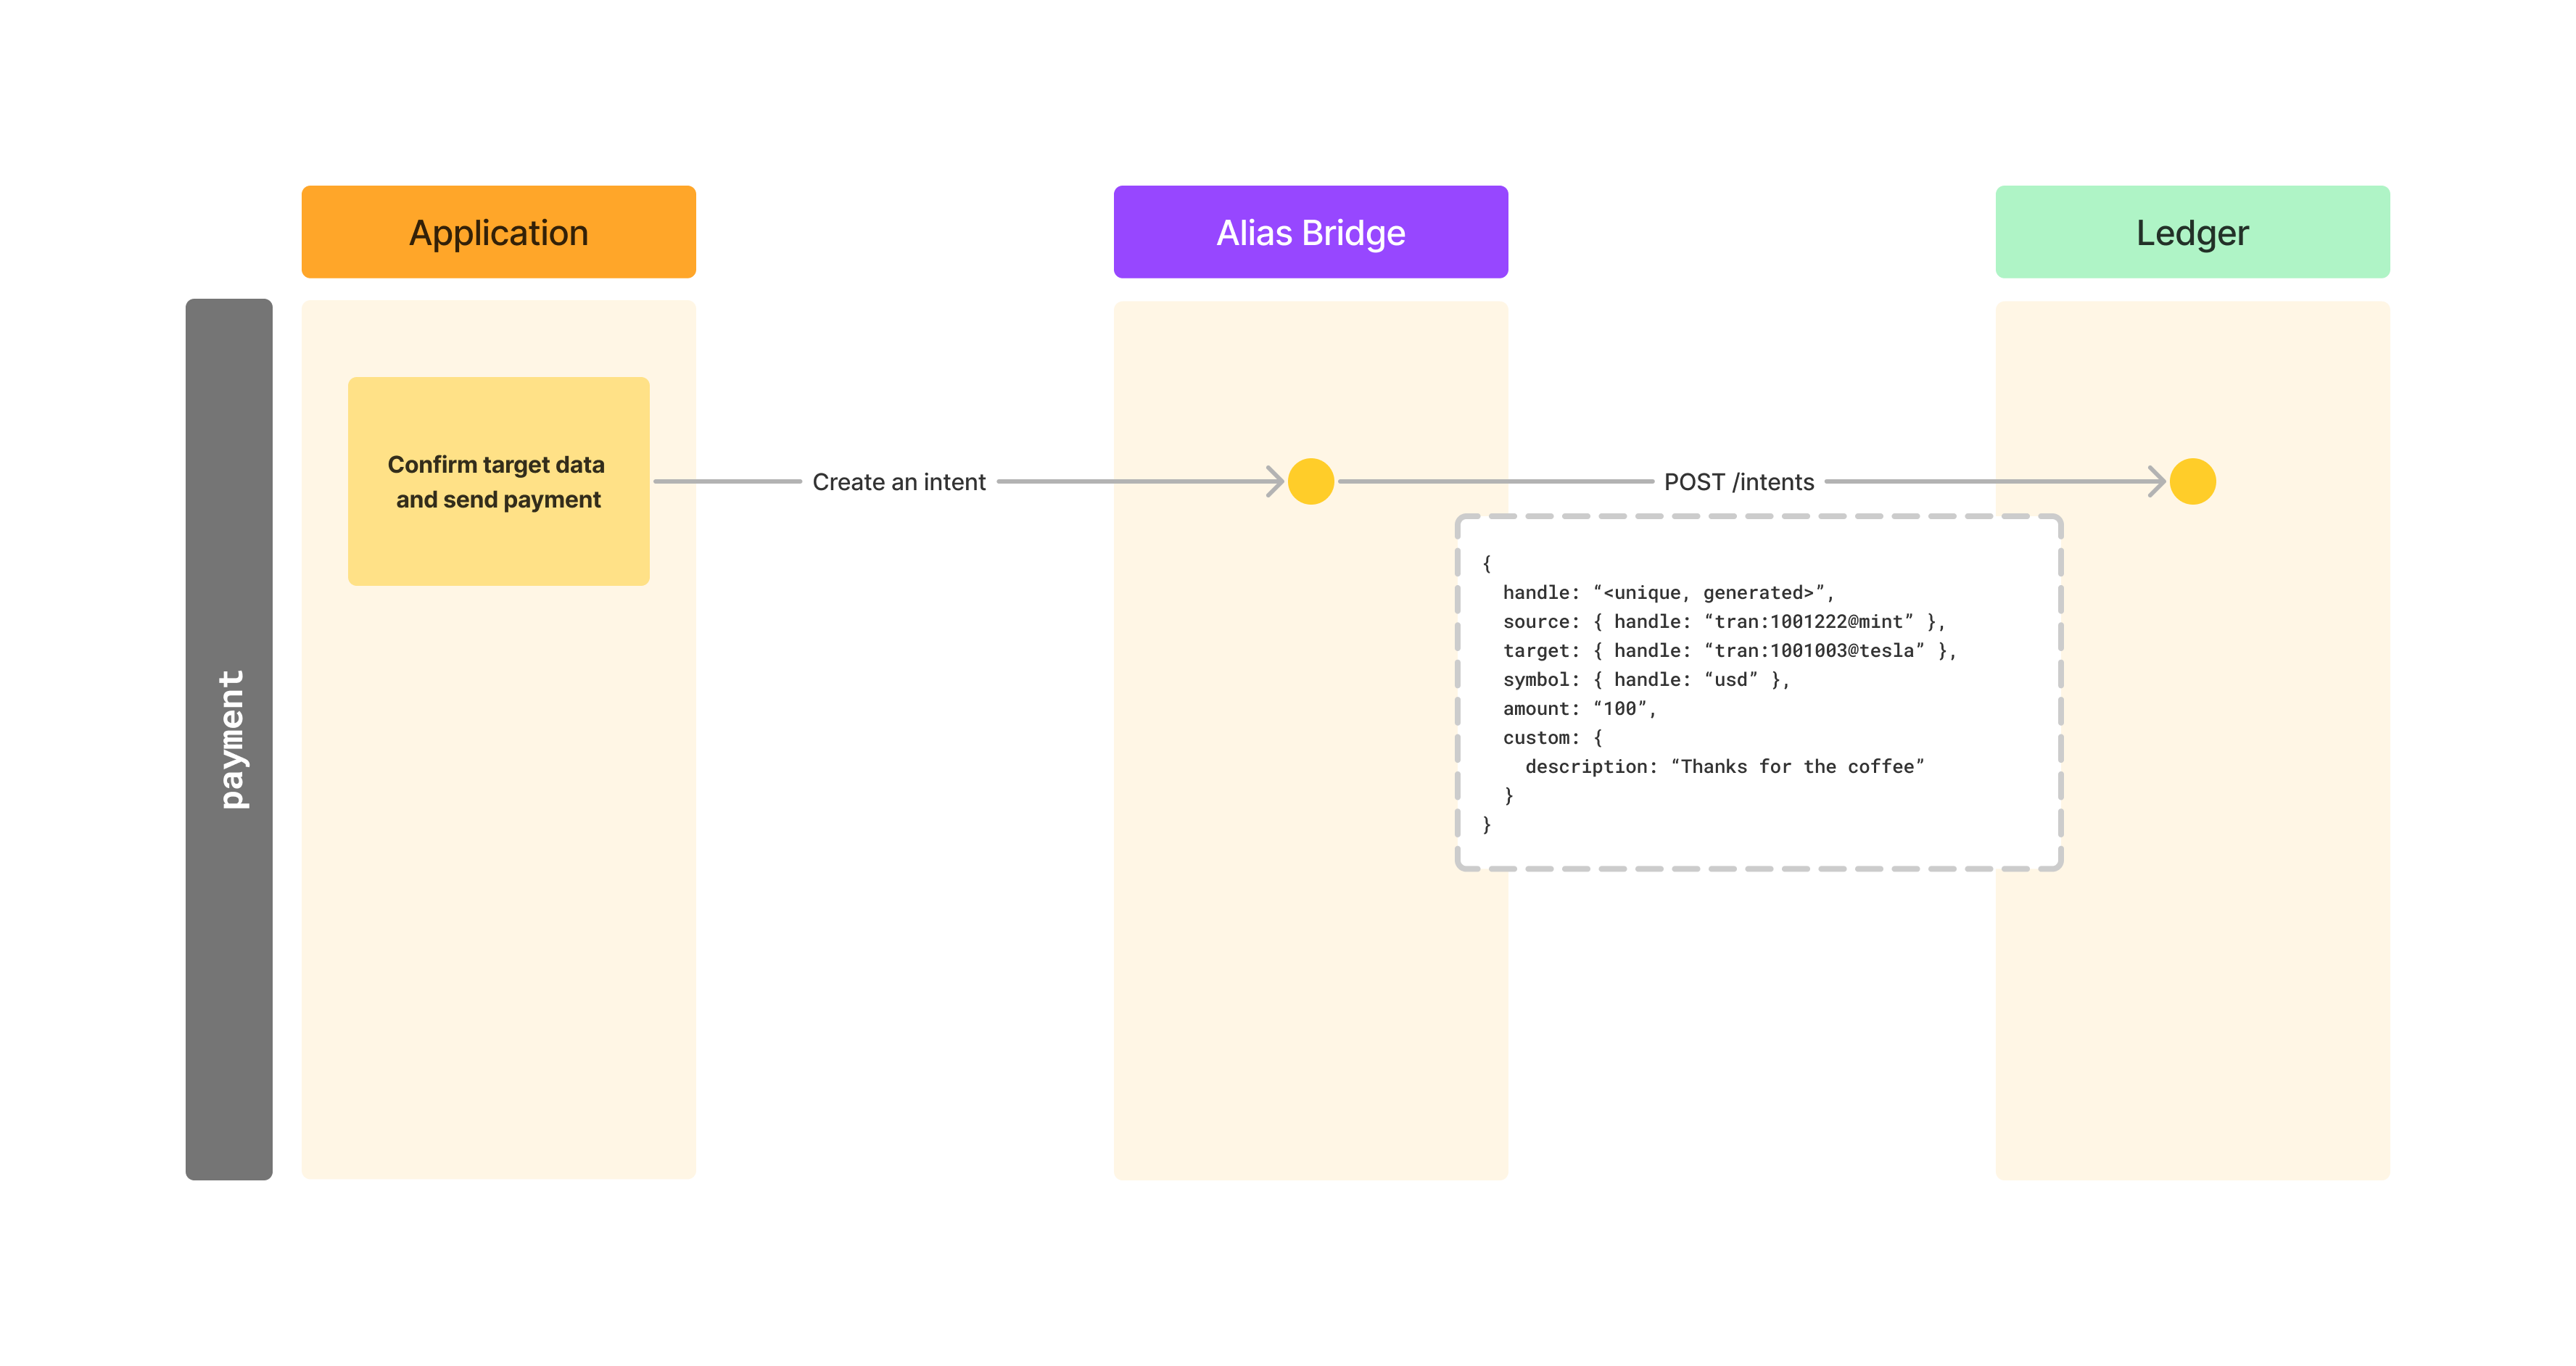
Making payments
Finally let’s see how to make a payment after we have resolved our target information. For this step we will use the the account we have resolved in the previous chapter, acc.1003.
Ledger supports making payments as well, so we will use our ledger in this case to demonstrate this final step. We don’t have to use ledger for this step, we could make this payment using any of the existing payment rails that are available to us.
To make this payment, we will create an intent using the data we received from in our anchor lookup. Intents are ledger records which are used to make balance movements.
We can of course create intents the same way we created wallets and anchors, but this functionality is not the main part of this tutorial, so we will use the CLI tool to make our intent:
$ minka intent create
? Handle: guCtdIdff06SAgCsG2gnv
? Schema: intent
? Action: transfer
? Source: tran:1009008@tesla
? Add custom data for source? Yes
? Field class: string
? Field title: documentType
? Field value: nidn
? Add another field? Yes
? Field class: string
? Field title: documentNumber
? Field value: 792720
? Add another field? No
? Target: tran:1001003@tesla
? Add custom data for target? Yes
? Field class: string
? Field title: documentType
? Field value: nidn
? Add another field? Yes
? Field class: string
? Field title: documentNumber
? Field value: 320482
? Add another field? No
? Symbol: usd
? Add custom data for symbol? No
? Amount: 10
? Add custom data for this action? No
? Add another action? No
? Add custom data for this intent? Yes
? Field class: string
? Field title: description
? Field value: A small gift
? Add another field? No
? Signers: admin

Intent summary:
---------------------------------------------------------------------------
Handle: guCtdIdff06SAgCsG2gnv

Action: transfer
 - Source: tran:1009008@tesla
   Custom:
     - documentType: nidn
     - documentNumber: 792720
 - Target: tran:1001003@tesla
   Custom:
     - documentType: nidn
     - documentNumber: 320482
 - Symbol: usd
 - Amount: $10

Custom:
  - description: A small gift

? Sign this intent using signer admin? Yes

✅ Intent signed and sent to ledger alias
Luid: $int.ScDiWmM7GX_tlPbbi
Intent status: pending
We have included document data as additional custom information about the source and target to show how this can be done. Existing rails often require including additional fields to identify users due to regulatory requirements.
The intent we created resulted in a balance movement in our ledger. We could also build another bridge for our ledger to connect it to an existing payment rail. This would allow us to make payments in existing systems by using the same APIs we are already familiar with. One ledger can have as many integration as necessary, so we could connect to many different rails without issues. You can find out more about building other types of bridges in our other tutorials.
Conclusion
In this tutorial we have built an alias bridge which shows us how to connect to ledger and consume ledger APIs from code. The bridge we have built is a demo only, the purpose of this bridge is to demonstrate the main concepts in a simple way. It should not be used in production without stricter validations and production hardening.
This tutorial shows only successful flows, to learn more about building a production ready implementation which covers all the cases please see our how to guides and references on core ledger concepts.