Making cross-ledger payments
Introduction
In this tutorial you are going to build a bridge that connects to a Minka Ledger in the cloud.
The ledger in the cloud represents an automated clearinghouse enabling real time payments and allows for a simple and easy clearing and reconciliation process between the participants.
The cloud ledger supports advanced concepts like intent chains and routing which allows us to model alias resolution flows directly on the ledger.
This makes it much simpler to onboard and connect third parties to the system. This approach also avoids errors that could happen because of incorrect implementations on the client side when alias resolution is implemented by clients.
As part of this tutorial we will define and implement two main financial processes required for our RTP use case:
- setting up the environment
- sending money
- executing upload or debit operation
- executing download or credit operation
- third party integration
Clearing is a process of exchanging messages about debt (IOUs) between the participants of a system. Clearing is time sensitive and in our case needs to happen in real time and has to be automated. The target user can access funds as soon as clearing process finishes, with target to be less than one second.
Settlement involves the interbank exchange of funds, usually it is done by balance movements between accounts in an external system, a central bank or another payments network.
You can learn more about clearing and settlement here.
Getting started
We will follow through this tutorial by using Minka CLI tool to simulate all interactions with the ledger. This is the simplest way to understand all the actions that need to be performed and see how ledger operates.
In order to follow this tutorial you have to have nodeJS v20 or newer installed on your machine. This tutorial uses a Minka Ledger, so our first task is to connect to it, for this we will use the Minka CLI tool.
Install the Minka CLI through your terminal:
$ npm install -g @minka/cliAfter installing the CLI tool, you will be able to interact with local or remote ledger instances by using the minka command. Checkout all the commands available by typing minka --help.
After we have installed a CLI, we can connect to a ledger by typing:
$ minka server connect
? Server URL: <ledger URL>

✅ Connected to server <server name> (<server URL>)

Active ledger: <ledger name>
Now we have everything ready to start tracking balances in the ledger.
If you haven’t received a Ledger URL, you can ask responsible person to send it to you.
Ensuring Cross Ledger Payments layout
Before creating your first intent, we first need to apply the Cross Ledger Payments layout to the ledger. Layouts are predefined configurations that help you quickly set up ledgers with proper security, authorization, and business logic. They provide a declarative way to set up complex ledger configurations without manual API calls. This particular layout establishes the foundation for the records that will be used throughout this tutorial.
You can learn more about layouts here.
We will apply the layout by using the minka layout apply command. If you have already applied this layout before, you don't need to run the command again, this step is only required once.
$ minka layout apply
? Select layout: Cross Ledger Payments
? Select main signer: clearinghouse
? Signer password for clearinghouse [hidden]

✅ Layout applied successfully:
Ledger: tutorial-ledger
Layout: Cross Ledger Payments
Layout changelog:
  Schema
    o p2p (added)
    o intent (added)
    o tel-alias (added)
    o bank-wallet (added)
  Signer
    o tesla (added)
    o minka (added)
    o ach (added)
  Circle
    o bank (added)
    o ach (added)
  Policy
    o default (added)
    o ach-access (added)
    o bank-access (added)
    o p2p-intent (added)
    o alias-directory (added)
  Symbol
    o usd (added)
    o dop (added)
  Wallet
    o ach (added)
    o tesla (added)
    o minka (added)
Your first payment intent
Balance movements are represented as payment intents in ledger. We are now going to make our first intent by using wallets that are already configured in the ledger.
tesla and minka are test banks already available in the ledger after applying the Cross Ledger Payments layout. Those banks are secured by keys stored in cloud. Passwords for decrypting those keys are the same as bank names to ease testing.
This is how we can initiate a payment intent from an account in tesla bank to an account in minka bank:
$ minka intent create
? Handle: SLNxTNsDy7wDwP48W
? Schema: p2p
? Action: transfer
? Source: account:1001001234@tesla
? Add custom data for source? No
? Target: account:1001009876@minka
? Add custom data for target? No
? Symbol: usd
? Add custom data for symbol? No
? Amount: 5
? Add custom data for this action? No
? Add another action? No
? Attach a policy? Yes
? Policy: p2p-intent
? Add custom data for this intent? No
? Signers: tesla
? Key password for tesla: [hidden]

Intent summary:
------------------------------------------------------------------------
Handle: SLNxTNsDy7wDwP48W

Action: transfer
 - Source: account:1001001234@tesla
 - Target: account:1001009876@minka
 - Symbol: usd
 - Amount: $5.00

? Sign this intent using signer tesla? Yes

✅ Intent signed and sent to ledger sandbox
Intent status: pending
After creating an intent, we can check that it completed and check the balances of bank wallets.
Beforehand we need to login to the ledger with a participant of this intent to be able to read it , either tesla or minka signer. Let's use tesla for this:
$ minka ledger login

? Signer: tesla
? Key password for tesla: [hidden]

✅ Logged in to ledger with tesla
Now we are able to see the balances of tesla wallet
$ minka wallet balances tesla
Balances:
$999,995.00 (usd)
$50,000,000.00 (dop)
Note that we are not allowed to see minka balances when logged in to ledger with tesla signer. So, let's login with tesla to proceed
$ minka ledger login

It seems you're currently logged in with ach
and you'll be logged out if you proceed with login

? Do you want to proceed? Yes
? Signer: minka
? Key password for minka: [hidden]

✅ Logged in to ledger with minka
$ minka wallet balances minka
Balances:
$1,000,005.00 (usd)
$50,000,000.00 (dop)Video summary of CLI operations
Setting up a bank
Next, we will start building our own integration with a banking core. We are going to call our bank mint for the purposes of this tutorial.
Use a unique name that isn’t already registered with the ledger for your bank and use that name instead of mint. To remind you of this mint is going to be marked in yellow throughout the tutorial.
First step is to create a signer for our new bank:
$ minka signer create
? Handle: mint
? Key pair source: Generate new key pair
? Add custom data (y/N)? No
? Signer password: [hidden]
? Repeat password: [hidden]
? Store to ledger? Public and encrypted secret key
⚠️ WARNING: Storing your secret key in a remote ledger is not recommended.
Secret key is going to be stored encrypted with the password you have provided.
You will not be able to recover or use the key without this password.
? Signer: mint (self)

✅ Signer created successfully:
Luid: snr.UPGiQU8owUq_jNXIn
Handle: mint
Public: wrXBXZMEy3wFTPVIk/hzBknOJ3K//BZXK9255rLnayU=
Secret: [value is hidden]

⚠️  WARNING: Secret or private key is critical data that should be handled
with care. Private keys are used to modify balances and it is important to
understand that anyone who has access to that key can perform sensitive
ledger operations.
Signers represent keys for signing all ledger operations. In this case we are storing the signer in ledger, which means that signer keys are kept encrypted with the given password in the ledger.
Now that we have our signer, we should add this signer to the circle bank because all the signers from circle bank are allowed to create wallets in the ledger
$ minka circle assign bank
? Signer Handle: mint
? Add custom data? Yes
? Signer: ach

✅ Signer assigned successfully:
Luid: $csn.-5U3YxB8pCJMpEtO8
Circle: bank
Signer handle: mint
Signer: wrXBXZMEy3wFTPVIk/hzBknOJ3K//BZXK9255rLnayU= (ach)
We can create a wallet that is going to be used to track settlement balances of our new bank:
$ minka wallet create
? Handle: mint
? Bridge: [none]
? Schema: bank-wallet
? Add custom data? Yes
? Field class: string
? Field title: name
? Field value: Mint bank
? Add another field? No
? Add routes? No
? Attach a policy? Yes
? Policy: default
? Signer: mint
? Key password for mint: [hidden]

✅ Wallet created successfully:
Luid: $wlt.K2kqwMvVcBqyS1zRE
Handle: mint
Signer: wrXBXZMEy3wFTPVIk/hzBknOJ3K//BZXK9255rLnayU= (mint)
Custom:
	- name: Mint bank
Wallets hold balances in ledger, the purpose of this wallet is to track aggregated balance for all bank transaction to simplify the settlement process.
We can check the wallets in the system by logging to the ledger with ach signer and using the following commands:
$ minka ledger login

? Signer: ach
? Key password for ach: [hidden]

✅ Logged in to ledger with ach
$ minka wallet list
╔══════════╤══════════╤════════════════════════════╤══════════╗
║ Handle │ Bridge │ Custom │ Routes ║
╟──────────┼──────────┼────────────────────────────┼──────────╢
║ mint │ None │ name: Mint bank │ None ║
╟──────────┼──────────┼────────────────────────────┼──────────╢
║ tesla │ None │ name: Tesla test bank │ None ║
╟──────────┼──────────┼────────────────────────────┼──────────╢
║ minka │ None │ name: Minka test bank │ None ║
╟──────────┼──────────┼────────────────────────────┼──────────╢
║ ach │ None │ name: Primary ACH wallet │ None ║
╚══════════╧══════════╧════════════════════════════╧══════════╝
? Showing page 1 of 1Signers from bank are able to see their own wallets only, on the other hand signers from circle ach are able to see all the wallets in the ledger.
We have created our signer and wallet, but we still don’t have any balance, the last step is to acquire balance from another participant in the system. Usually this is done by an ACH or a similar system operator:
$ minka intent create

? Handle: wVikIy7K2c1znG1k5
? Schema: p2p
? Action: transfer
? Source: ach
? Add custom data for source? No
? Target: mint
? Add custom data for target? No
? Symbol: usd
? Add custom data for symbol? No
? Amount: 100000
? Add custom data for this action? No
? Add another action? No
? Attach a policy? Yes
? Policy: p2p-intent
? Add custom data for this intent? Yes
? Field class: string
? Field title: description
? Field value: Initial bank topu§p
? Add another field? No
? Signers: ach
? Key password for ach: [hidden]

Intent summary:
------------------------------------------------------------------------
Handle: wVikIy7K2c1znG1k5

Action: transfer
 - Source: ach
 - Target: mint
 - Symbol: usd
 - Amount: $100,000.00

? Sign this intent using signer ach? Yes

✅ Intent signed and sent to ledger sandbox
Intent status: pending
Transfers like the one we made above are usually done after a business agreement is made and required funds are transferred through a central bank or a similar trusted financial entity.
We now have funds in our wallet and can start making transactions with other participants of the system, we can check our balance the same way as we did earlier:
$ minka wallet balances mint
Balances:
$100,000.00 (usd)
Video summary of CLI operations
Connecting a banking core
External transactional systems connect to ledger by building an integration layer called bridge. When a bridge is assigned to a wallet, ledger will require confirmation from the bridge for each balance movement on the wallet. This allows us to reliably mirror all balance movements to external ledgers like existing banking cores or similar.
Minka CLI has a feature that enables you to simulate a remote bridge implementation. You can run a local server that listens to requests sent by ledger and react to those requests by providing required signatures. This allows you to get detailed insights in how ledger and bridge interactions are supposed to work:
$ minka bridge start
? Signer: mint
? Register with ledger? Yes
? Handle: mint
? Schema? rest

Cloud ledger detected, creating a tunnel...
Created ✔

Bridge is available through following URLs:
 - Server URL: http://localhost:4042/v2
 - Public URL: https://7d46-212-15-177-2.ngrok.io/v2

Registering mint with ledger...
Bridge record not found, creating it...
Registered ✔

✅ Bridge is running on port 4042.

Checking for undelivered requests...
None found ✔

Waiting for new requests...
CLI starts a local server and registers it with ledger automatically by creating a bridge record.
Leave the bridge running and continue the tutorial in a new terminal.
After our bridge has been registered with ledger we can assign it to our wallet:
$ minka wallet update mint

Wallet data:
------------------------------------------
Handle: mint

Custom:
  - name: Mint bank

Access rules:
#0
  - Policy: default

Updates:
------------------------------------------
? Select the field to update, select Finish to save changes. Bridge
? Bridge: mint
? Select the field to update, select Finish to save changes. Finish
Updates received.

? Signer: mint
? Key password for mint: [hidden]

✅ Wallet updated successfully:
Handle: mint
Signer: wrXBXZMEy3wFTPVIk/hzBknOJ3K//BZXK9255rLnayU= (mint)
After making this change, ledger is going to contact our bridge to confirm any debit or credit from our bank wallet. We will see how this works in the following chapters. We can check that our wallet has a bridge set by getting it from ledger:
$ minka wallet show mint

Wallet data:
------------------------------------------
Handle: mint
Parent: 94830b885cc73a2b9cf6a326a18312ea0c66573c23c45f82d6c7901f01adf9ff
Bridge: mint

Custom:
  - name: Mint bank

Access rules:
#0
  - Policy: default
Response object now contains two new fields: bridge and parent. Parent is a pointer to the previous version of our wallet which allows us to keep track of all system changes.
Video summary of CLI operations
Processing core transactions
The next thing we will explore is how debits and credits are handled on the bridge. We can trigger a debit on our local bridge by sending funds from our wallet:
$ minka intent create

? Handle: bSH5NIBW4vPoNvegx
? Schema: p2p
? Action: transfer
? Source: account:1001001212@mint
? Add custom data for source? No
? Target: account:1001001234@tesla
? Add custom data for target? No
? Symbol: usd
? Add custom data for symbol? No
? Amount: 4
? Add custom data for this action? No
? Add another action? No
? Attach a policy? Yes
? Policy: p2p-intent
? Add custom data for this intent? No
? Signers: mint
? Key password for mint: [hidden]

Intent summary:
------------------------------------------------------------------------
Handle: bSH5NIBW4vPoNvegx

Action: transfer
 - Source: account:1001001212@mint
 - Target: account:1001001234@tesla
 - Symbol: usd
 - Amount: $4.00

? Sign this intent using signer mint? Yes

✅ Intent signed and sent to ledger sandbox
Intent status: pending
The account number in real world implementations would be verified by participating bank bridges. You can use any account numbers in these examples since we are not doing any validations in our bridge.
Ledger detects that a source wallet of this balance movement has a bridge assigned and it sends a prepare debit request to it. We can see this in the terminal window that is running our bridge:
$ minka bridge start
? Signer: mint
? Register with ledger? Yes
? Handle: mint

Cloud ledger detected, creating a tunnel...
Created ✔

Bridge is available through following URLs:
 - Server URL: http://localhost:4042
 - Public URL: https://7d46-212-15-177-2.ngrok.io

Registering mint with ledger...
Bridge record not found, creating it...
Registered ✔

✅ A bridge instance is running on port 4042.

Checking for undelivered requests...
None found ✔

Waiting for new requests...

prepare-debit for intent bSH5NIBW4vPoNvegx received:
------------------------------------------
 - Source: account:1001001212@mint
 - Amount: $4.00
 - Symbol: usd
------------------------------------------

Type p to prepare, f to fail or i to ignore: Prepare
? Core Id: tx1
Debit prepared, reply sent to ledger ✔
As confirmation, bridge sends a signature to ledger that contains a unique coreId (transaction reference) of the operation performed by the bridge.
The entire intent payload is delivered to the bridge as part of this request as well for verification purposes.
This request is part of a two phase commit protocol that ledger uses in order to ensure that all participants in a distributed transaction correctly perform their responsibilities. Confirmations sent to ledger must be the signatures made with a private key registered with the bridge and contain a transaction reference of the operation performed by the bridge as evidence.
Errors are handled in a similar way, a signature with error details must be sent to the ledger. In case the bridge is down, ledger will retry requests.
Each request sent by the ledger has a unique id which serves as an idempotency token to prevent double operations. This id is sent in the handle field of the incoming request.
The prepare request should reserve funds on the bank side, but the entry isn’t considered completed until a commit or abort request is received from the ledger.
After the target bank processes the prepare credit request, ledger will deliver a commit request for debit to the bridge:
commit-debit for intent bSH5NIBW4vPoNvegx received:
------------------------------------------
 - Source: account:1001001212@mint
 - Amount: $4.00
 - Symbol: usd
------------------------------------------
? Type c to confirm or i to ignore: Confirm
? Core Id: tx1
Debit committed, reply sent to ledger ✔
Returned coreId for this request can be the same as in prepare, if no new transaction was performed by the bank, or a new coreId in case another transaction was performed.
Commit phase starts after all intent preconditions are fulfilled. To summarize, two things are important to understand about two phase commit protocol:
- Prepare requests are not final, they can still be reverted by the ledger
- If a commit of a prepared request is later sent by the ledger, it must succeed. Commit after a successful prepare must not fail, ledger will retry it until it succeeds.
Banks can implement this step in various ways. It can be a reservation of funds in the banking core or a transaction that could be reversed in case the entry is aborted.
We can check that everything is completed successfully by checking the intent status and our balance:
$ minka intent show bSH5NIBW4vPoNvegx

Intent summary:
------------------------------------------------------------------------
Handle: bSH5NIBW4vPoNvegx

Action: transfer
 - Source: account:1001001212@mint
 - Target: account:1001001234@tesla
 - Symbol: usd
 - Amount: $4.00

Status: completed
$ minka wallet balances mint
Balances:
$99,996.00 (usd)Video summary of CLI operations
Alias directory and routing
Alias addresses are modeled in ledger using wallets as well. Alias wallets have a schema that defines the type of alias which the wallet represents. Another ledger feature that is often used for alias directories are wallet routes. Routes allow us to automatically configure routing of funds to linked accounts.
We will now create a phone alias account with a route to a bank account in our mint bank:
$ minka wallet create
? Handle: tel:13334444333
? Bridge: [none]
? Schema: tel-alias
? Add custom data? No
? Add routes? Yes
? Set route filter? Yes
? Field: symbol
? Value: usd
? Add another condition? No
? Route action: forward
? Route target: account:1001001212@mint
? Add another route? No
? Attach a policy? yes
? Policy: alias-directory
? Signer: mint

✅ Wallet created successfully:
Luid: $wlt.zTLXzSIAhdySfayBz
Handle: tel:13334444333
Signer: wrXBXZMEy3wFTPVIk/hzBknOJ3K//BZXK9255rLnayU= (mint)
Route filters can target any field of the incoming payment. In the example above, we are forwarding all incoming payments in usd to account:1001001212@mint.
With this in place, we can now send money to an alias address and ledger will automatically route the payment to a configured target:
$ minka intent create

? Handle: enI1cOKvE5IwIlzj0
? Schema: p2p
? Action: transfer
? Source: account:1001001234@tesla
? Add custom data for source? No
? Target: tel:13334444333
? Add custom data for target? No
? Symbol: usd
? Add custom data for symbol? No
? Amount: 12
? Add custom data for this action? No
? Add another action? No
? Attach a policy? Yes
? Policy: p2p-intent
? Add custom data for this intent? No
? Signers: tesla

Intent summary:
------------------------------------------------------------------------
Handle: enI1cOKvE5IwIlzj0

Action: transfer
 - Source: account:1001001234@tesla
 - Target: tel:13334444333
 - Symbol: usd
 - Amount: $12.00

? Sign this intent using signer tesla? Yes

✅ Intent signed and sent to ledger sandbox
Intent status: pending
If everything is configured correctly, we will now receive prepare credit and commit credit requests to our mint bridge:
prepare-credit for intent G87LoeUbVTuuO6QxP received:
------------------------------------------
 - Origin: enI1cOKvE5IwIlzj0  [originating intent handle]
 - Target: account:1001001212@mint
 - Amount: $12.00
 - Symbol: usd
------------------------------------------

Type p to prepare, f to fail or i to ignore: Prepare
? Core Id: tx2
Credit prepared, reply sent to ledger ✔

commit-credit for intent G87LoeUbVTuuO6QxP received:
------------------------------------------
 - Origin: enI1cOKvE5IwIlzj0  [originating intent handle]
 - Target: account:1001001212@mint
 - Amount: $12.00
 - Symbol: usd
------------------------------------------
? Type c to confirm or i to ignore: Confirm
? Core Id: tx2
Credit committed, reply sent to ledger ✔
You may notice that intent handle is different from the original intent we created. Ledger automatically creates a new intent to route the funds to final destination. The reference to the original intent is stored in the origin property of the newly created intent.

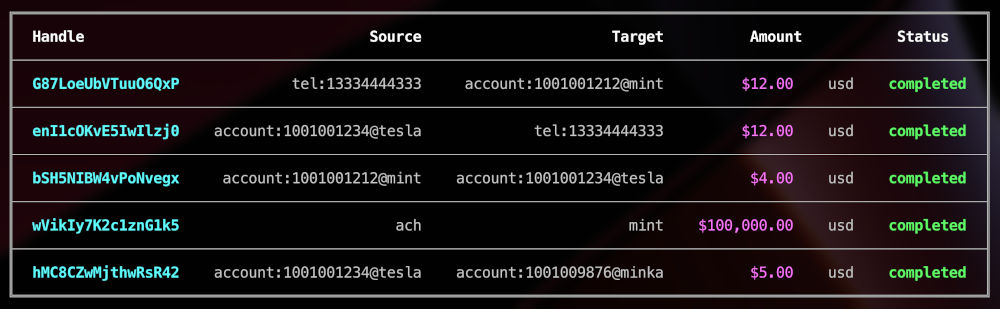
Summary of intents involved in this operation
We can again check that everything is completed successfully by checking the intent status and our balance:
$ minka intent show enI1cOKvE5IwIlzj0

Intent summary:
------------------------------------------------------------------------
Handle: enI1cOKvE5IwIlzj0

Action: transfer
 - Source: account:1001001234@tesla
 - Target: tel:13334444333
 - Symbol: usd
 - Amount: $12.00

Status: completed
$ minka intent show G87LoeUbVTuuO6QxP
Intent summary:
------------------------------------------------------------------------
Handle: G87LoeUbVTuuO6QxP
Action: transfer
- Source: tel:13334444333
- Target: account:1001001212@mint
- Symbol: usd
- Amount: $12.00
Status: completed$ minka wallet balances mint
Balances:
$100,008.00 (usd)Video summary of CLI operations
Conclusion
With this tutorial we have demonstrated interactions between remote systems, for example separate banking cores, and the ledger which is running an alias directory.
This tutorial shows only a successful flow, to learn more about building a production ready implementation which covers all the cases please see our how to guides and references on core ledger concepts.
For reference, here is a summary of intents performed as part of this tutorial:
Tutorial intents summary