Creating your first payment
Introduction
In this tutorial you are going to install a Minka command line tool (CLI) and see how we can interact with a real time system from a more technical perspective. We are going to use this tool to create our first payment intent.
In order to follow this tutorial you have to have nodeJS v20 or newer installed on your machine. This tutorial uses a Minka Ledger, so our first task is to connect to it using the Minka CLI tool.
If you haven’t set up your Studio, please follow the Joining an RTP system tutorial first and return here after doing that.
Installing the CLI
Install the Minka CLI by running the following command in your terminal:
$ npm install -g @minka/cliAfter installing the CLI tool, you will be able to interact with local or remote ledger instances by using the minka command. Check out all the commands available by typing minka --help.
$ minka
Usage: minka [options] [command]

Options:
  --no-color            disable colored text (e.g. for test purposes)
  -V, --version         output the version number
  -v, --verbose         print more detailed output
  -ie, --inline-editor  do not open editor for inputs
  -t, --trace           prints even more details than verbose
  -h, --help            display help for command

Commands:
  server                connect to a server hosting ledgers
  ledger                connect to and manage ledger instances
  signer                manage local and remote signing keys
  wallet                manage wallets, ledger records that hold balances
  intent                create payment intents to transfer balances
  symbol                manage currencies available in ledger
  bridge                connect external integrations to ledger
  effect                observe and react to changes in ledger
  report                create and download reports
  schema                configure record fields validation rules
  domain                organize ledger records into namespaces
  circle                group signers to manage permissions more easily
  policy                configure ledger business rules
  anchor                link payment credentials to aliases
  layout                apply predefined ledger configurations
  system                advanced system monitoring and configuration
  help [command]        display help for command
Connecting to ledger
After we have installed a CLI, we can connect to a ledger by typing:
$ minka server connect
? Server URL: <ledger URL>

✅ Connected to server <server name> (<server URL>)

Active ledger: <ledger name>
Ledger URL, required as an input, has the format https://<ledger>.<server>. You can get your ledger URL from Studio URL by removing the /studio/... part. For example, if the URL is https://ach.example.com/studio, the ledger URL you need to use is https://ach.example.com.
We can test that everything is working correctly by logging in as a test bank. Our RTP ledger comes with a test bank preconfigured, the name of this bank is Tesla Bank (teslabank). To login as this bank, use the following command:
$ minka ledger login
? Signer: teslabank
? Signer password for teslabank [hidden]

✅ Logged in as teslabank.
The password for teslabank is tesla.
Creating an intent
With everything setup and connected, we can create our first payment intent. For this we will use Tesla Bank to send make a payment to a user from our own bank.
Don’t forget to replace mintbank from the tutorial examples with your own bank.
We can create an intent like this:
$ minka intent create -a
? Handle: k3PdrLoh1m1BnKlr0Kou7
? Schema: transfer
? Action: transfer
? Source: svgs:1001001345@teslabank.io
? Add custom data for source? Yes
? Field class: string
? Field title: name
? Field value: Nikola Tesla
? Add another field? Yes
? Field class: string
? Field title: entityType
? Field value: individual
? Add another field? Yes
? Field class: string
? Field title: idType
? Field value: nidn
? Add another field? Yes
? Field class: string
? Field title: idNumber
? Field value: 429493434
? Add another field? No
? Target: svgs:1001009422@mintbank.dev
? Add custom data for target? Yes
? Field class: string
? Field title: name
? Field value: John Locke
? Add another field? Yes
? Field class: string
? Field title: entityType
? Field value: individual
? Add another field? Yes
? Field class: string
? Field title: idType
? Field value: nidn
? Add another field? Yes
? Field class: string
? Field title: idNumber
? Field value: 58252939
? Add another field? No
? Symbol: usd
? Add custom data for symbol? No
? Amount: 42
? Add custom data for this action? No
? Add another action? No
? Attach a policy? No
? Intent commit mode: auto
? Add custom data for this intent? Yes
? Field class: string
? Field title: description
? Field value: Our first intent
? Add another field? No
? Signers: teslabank
? Signer password for teslabank [hidden]

Intent summary:
---------------------------------------------------------------------------
Handle: k3PdrLoh1m1BnKlr0Kou7
Schema: transfer

Action: transfer
 - Source: svgs:1001001345@teslabank.io
   Custom (source):
     - name: Nikola Tesla
     - entityType: individual
     - idType: nidn
     - idNumber: 429493434
 - Target: svgs:1001009422@mintbank.dev
   Custom (target):
     - name: John Locke
     - entityType: individual
     - idType: nidn
     - idNumber: 58252939
 - Symbol: usd
 - Amount: $42.00

Custom (intent):
  - description: Our first intent

? Sign this intent using signer teslabank? Yes

✅ Intent signed and sent to ledger ach
Luid: $int.3vf2J78sptIkQr2lq
Intent status: pending
We need to sign this intent using teslabank signer which is a remote signer available on the ledger since the source user is a user of that bank.
For user information and account numbers we can use any values which have a correct format. Tesla Bank is a demo bank which doesn’t validate this data and we haven’t connected any custom integration for our bank, so all payment intents are accepted by default.
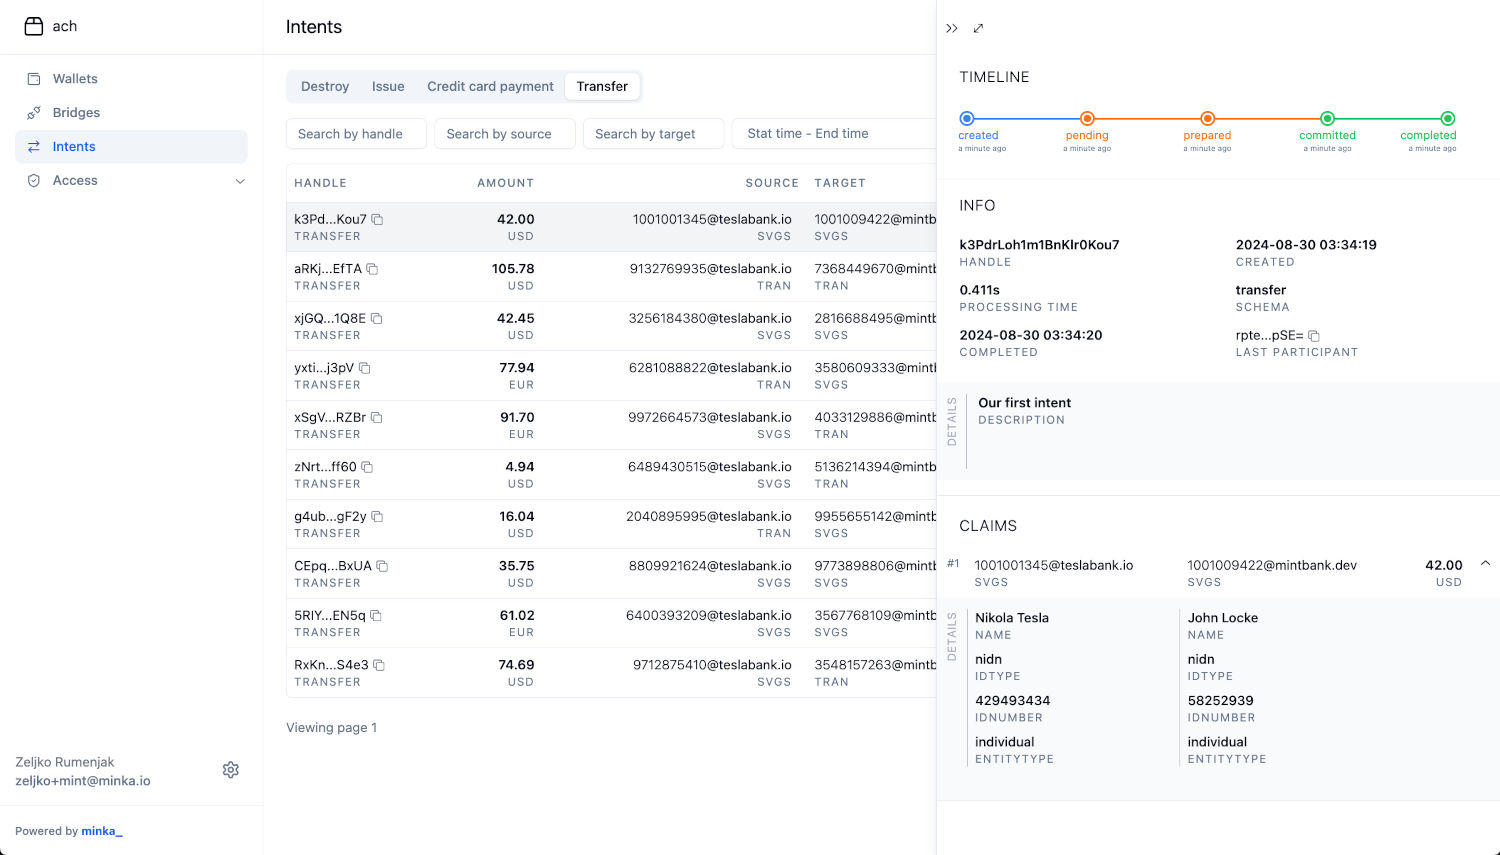
If we open our Studio dashboard now, we should see our intent under transfers:
Debugging ledger requests
CLI has a --verbose argument which can be used with all commands. This argument prints detailed information about a request which was sent to ledger.
All CLI commands are communicating with ledger using standard REST APIs, using verbose parameter will allow us to examine those requests in more detail. This is useful for debugging and also to learn more about how ledger APIs work.
For example, let’s print detailed information about the intent we just made:
$ minka intent show k3PdrLoh1m1BnKlr0Kou7 --verbose

Request details:
GET https://ldg-dev.one/api/v2/intents/k3PdrLoh1m1BnKlr0Kou7

Headers:
  - Accept: application/json, text/plain, */*
  - Content-Type: undefined
  - User-Agent: MinkaCLI/2.13.0 LedgerSDK/2.13.0
  - Authorization: Bearer eyJhbGciOiJFZERTQSIsImtpZCI6InJwdGVaNGtPdWlCNmE5L0tIQ3FPYzhIY1c1SjIwSHJiNUQ0WkNiWllwU0U9In0.eyJpYXQiOjE3MjQ5OTAxNjAsImV4cCI6MTcyNDk5Mzc2MCwiaXNzIjoiY2xpIiwiYXVkIjoiYWNoIiwic3ViIjoic2lnbmVyOnRlc2xhYmFuayIsImhzaCI6IjYxNjQyNGE1ZGFiZDVmZWI5MTEyNWI4NWE4MjlhOTZhOTdhMjM1ZTA2ZGE2ZDlmZjVkYWVmNjY1ZWRlYTI1NTc6eC1sZWRnZXIifQ.jExAiUNPyNgukJpPMfDKnmNVEBW8n7ejyfT5WUWwtQ4oOqnmYAjJA_w6GaHC3uYQhRJ-aSO-xzRQVnudDrKzAg
  - X-Ledger: ach
  - Accept-Encoding: gzip, compress, deflate, br

Response details:
Status: 200 OK

Headers:
  - access-control-allow-origin: *
  - content-type: application/json; charset=utf-8
  - etag: W/"a41-yaypqwROuKvNJbUF9bUQ3qMZWoc"
  - x-cloud-trace-context: 628f31ac5a12077fd4b5d0fa3d94081f
  - date: Fri, 30 Aug 2024 03:56:01 GMT
  - server: Google Frontend
  - content-length: 2625
  - via: 1.1 google
  - alt-svc: h3=":443"; ma=2592000,h3-29=":443"; ma=2592000

{
  "hash": "10c95130a3fc1d4cadf09e9a1c03008529a12765e10242e9d71540d2b588d56b",
  "data": {
    "handle": "k3PdrLoh1m1BnKlr0Kou7",
    "claims": [
      {
        "action": "transfer",
        "amount": 4200,
        "source": {
          "custom": {
            "name": "Nikola Tesla",
            "idType": "nidn",
            "idNumber": "429493434",
            "entityType": "individual"
          },
          "handle": "svgs:1001001345@teslabank.io"
        },
        "symbol": {
          "handle": "usd"
        },
        "target": {
          "custom": {
            "name": "John Locke",
            "idType": "nidn",
            "idNumber": "58252939",
            "entityType": "individual"
          },
          "handle": "svgs:1001009422@mintbank.dev"
        }
      }
    ],
    "schema": "transfer",
    "custom": {
      "description": "Our first intent"
    },
    "access": [
      {
        "action": "any",
        "signer": {
          "public": "rpteZ4kOuiB6a9/KHCqOc8HcW5J20Hrb5D4ZCbZYpSE="
        }
      },
      {
        "action": "read",
        "bearer": {
          "$signer": {
            "public": "rpteZ4kOuiB6a9/KHCqOc8HcW5J20Hrb5D4ZCbZYpSE="
          }
        }
      }
    ],
    "config": {
      "commit": "auto"
    }
  },
  "luid": "$int.3vf2J78sptIkQr2lq",
  "meta": {
    "proofs": [
      {
        "custom": {
          "moment": "2024-08-30T03:34:19.425Z",
          "status": "created"
        },
        "digest": "ccec86775d8b305c5bebeb228a4d6a86578bca526eea9ff11bb563359801c9d1",
        "method": "ed25519-v2",
        "public": "rpteZ4kOuiB6a9/KHCqOc8HcW5J20Hrb5D4ZCbZYpSE=",
        "result": "1iuU0QxYh/FamG2F5c4qrk3+4nbMOz7MeIRzDiO4FZG2syIE4F1Xu7KgVk0qkwk9RENkXlOr468T34FgbHR7Bg=="
      },
      {
        "custom": {
          "luid": "$int.3vf2J78sptIkQr2lq",
          "moment": "2024-08-30T03:34:19.930Z",
          "status": "created"
        },
        "digest": "3284fd20a02bdd8ef76bbae1e4ace97c7eda9e912e9c108025344e772484cd5b",
        "method": "ed25519-v2",
        "public": "MrByXmC5wKLCV0irkNlLTeO/DmmyI0xVPwI29Os2njQ=",
        "result": "11AST4aUMNBxU0SrBBYUXuqDoGs07bPYOgmVm3+DZ5J1URDgneKJInVNCYgOH70oP/mdLnMzr5fC9OB27ZiECQ=="
      },
      {
        "custom": {
          "moment": "2024-08-30T03:34:20.112Z",
          "status": "prepared"
        },
        "digest": "69fb7058008b7d20fa2698cf0ca3c7dc3935008bc2f304a0a008c59ed8836a9e",
        "method": "ed25519-v2",
        "public": "MrByXmC5wKLCV0irkNlLTeO/DmmyI0xVPwI29Os2njQ=",
        "result": "/vT3kFZgM8sVenB6yKeUkdCJ3evRpUEd+7Kn3Nn46/nE/q+07l8XVev0EXusvSlrF3sTx1ujewhJ4H1abD5gDg=="
      },
      {
        "custom": {
          "moment": "2024-08-30T03:34:20.282Z",
          "status": "committed"
        },
        "digest": "44314a97ce0cf860f1ed693e2aebdb2cf2972b4b55f228f92f9620d32dd2cdbe",
        "method": "ed25519-v2",
        "public": "MrByXmC5wKLCV0irkNlLTeO/DmmyI0xVPwI29Os2njQ=",
        "result": "UxH2xNDhFX65w2ub9MSZZBPCl83s16f4f036MbFnNomWWTq9BWh2DDVhd95TM/ugjWc6MpaIYWtUndGY5kh0Cg=="
      },
      {
        "custom": {
          "moment": "2024-08-30T03:34:20.341Z",
          "status": "completed"
        },
        "digest": "046cfd53187e0ca9b45de1c63800a35ca56855b8cc79ce8cbffc578344cbd67e",
        "method": "ed25519-v2",
        "public": "MrByXmC5wKLCV0irkNlLTeO/DmmyI0xVPwI29Os2njQ=",
        "result": "qaY/b86Op+g5mjZXlKab/L/6nROf6AtffehFOkvXhySJtXgTVtNhoRA28aQQt9c7xtlhrHcyvSQV9uxDF1oiAA=="
      }
    ],
    "routed": true,
    "status": "completed",
    "thread": "7RFbLLoTabUa7zX1W",
    "moment": "2024-08-30T03:34:19.938Z",
    "owners": [
      "rpteZ4kOuiB6a9/KHCqOc8HcW5J20Hrb5D4ZCbZYpSE="
    ]
  }
}

Intent summary:
---------------------------------------------------------------------------
Handle: k3PdrLoh1m1BnKlr0Kou7
Schema: transfer

Action: transfer
 - Source: svgs:1001001345@teslabank.io
   Custom (source):
     - name: Nikola Tesla
     - idType: nidn
     - idNumber: 429493434
     - entityType: individual
 - Target: svgs:1001009422@mintbank.dev
   Custom (target):
     - name: John Locke
     - idType: nidn
     - idNumber: 58252939
     - entityType: individual
 - Symbol: usd
 - Amount: $42.00

Custom (intent):
  - description: Our first intent

Access rules:
#0
  - Action: any
  - Signer:
    - public: rpteZ4kOuiB6a9/KHCqOc8HcW5J20Hrb5D4ZCbZYpSE=
#1
  - Action: read
  - Bearer:
    - $signer:
      - public:  rpteZ4kOuiB6a9/KHCqOc8HcW5J20Hrb5D4ZCbZYpSE=

Status: completed
In the output we can see all the information about the request and the response. We can see the full URL, HTTP method, headers and the entire body of the request.
This works for all CLI commands, so you can use it to learn more about ledger APIs.
What’s next?
In the next tutorial we will explore how to connect a core banking system to a real time payments network. We will learn more about the two phase commit protocol which is used to synchronize operations between participants of an RTP system efficiently and reliably.