Integrating with an RTP rail
Introduction
Integrating core banking systems with other payments systems is usually a complex and long project. In this tutorial we will show a two phase commit protocol which enables us to synchronize payments systems efficiently and reliably.
Having a standard protocol in place helps to speed up the integration process significantly. The main focus of this tutorial is to explore the protocol and messages that are exchanged between participants.
Future tutorials are going to show how to implement your own bridge and help you get started with tools that help you to do it faster. The scope of this tutorial is to understand the protocol well before jumping into code.
We will run a demo bridge locally using the Minka CLI tool. This tool allows us to examine all messages and manually send replies to the ACH ledger.
Creating a private key
Ledger security model is based on digital keys, a cryptographic system which allows us to verify our identity and confirm operations by using a private key. Each digital key consists of two parts: a public and a private key. Your private key should never be shared with anyone. Public key may be safely shared with other participants and are used to confirm that an operation was performed by us.
You will need to use the Minka CLI tool for this tutorial and you will need to have access to an ACH ledger. Follow previous tutorials to get onboarded, if you haven’t done this already.
Digital keys are stored as signer ledger records. Each signer identifies a single key pair and may contain additional information about the key owner. Signers allow us to identify system participants. To start building our integration we will first create a new signer that is going to represent this integration in ledger. The simplest way to do this is by using the Minka CLI tool:
$ minka signer create
? Handle: bridge@mintbank.dev
? Key pair source: Generate new key pair
? Add custom data? No
? Signer password: [hidden]
? Repeat password: [hidden]

Signer bridge@mintbank.dev saved locally.
? Store to ledger? No

✅ Signer created successfully:
Handle: bridge@mintbank.dev
Public: rTM/+ly1Ytxu7ui9IYpuhA5HFDdJ+u/cQHQDkCttnTY=
Secret: [value is hidden]

⚠️  WARNING: Secret or private key is critical data that should be handled
with care. Private keys are used to modify balances and it is important to
understand that anyone who has access to that key can perform sensitive
ledger operations.
Cryptographic algorithms used by ledger are standard and documented. You can use any tool or programming language which supports these algorithms to create your keys. Minka CLI is used here because it is the easiest to get started with, but it isn’t required to use it.
Starting a local bridge
All integrations that connect other systems to ledger are called bridges. These are usually two way connections, on one side a bridge connect to ledger and on the other side to an external system. Messages can flow in both ways between those systems.
Minka CLI has a demo bridge already embedded in the tool. This bridge implements the ledger protocol and works in the interactive mode. It prints all received messages and allows us to manually respond to them.
We can start this bridge by running the following command:
$ minka bridge start
? Signer: bridge@mintbank.dev
? Signer password for bridge@mintbank.dev [hidden]
? Register with ledger? No

Cloud ledger detected, creating a tunnel...
Created ✔

Bridge is available through following URLs:
 - Server URL: http://localhost:4042/v2
 - Public URL: https://grumpy-llamas-share.loca.lt/v2

✅ Bridge is running on port 4042.
Press ctrl + c to exit.

Checking for undelivered requests...
None found ✔

Waiting for new requests...
It is important to answer to Register with ledger with No. This is only necessary for the first registration. Our local signer still doesn’t have permissions on the ledger, so this operation would fail. We will do this manually in the next chapter and grant required permissions.
Registering a bridge with ledger
Each integration is identified by a digital key, we have created a new key in the previous chapter, let’s now register an integration using this key with ledger.
By registering a bridge we will grant permissions to our newly generated key to do specific operations. By default a new key does not have any permissions on a ledger.
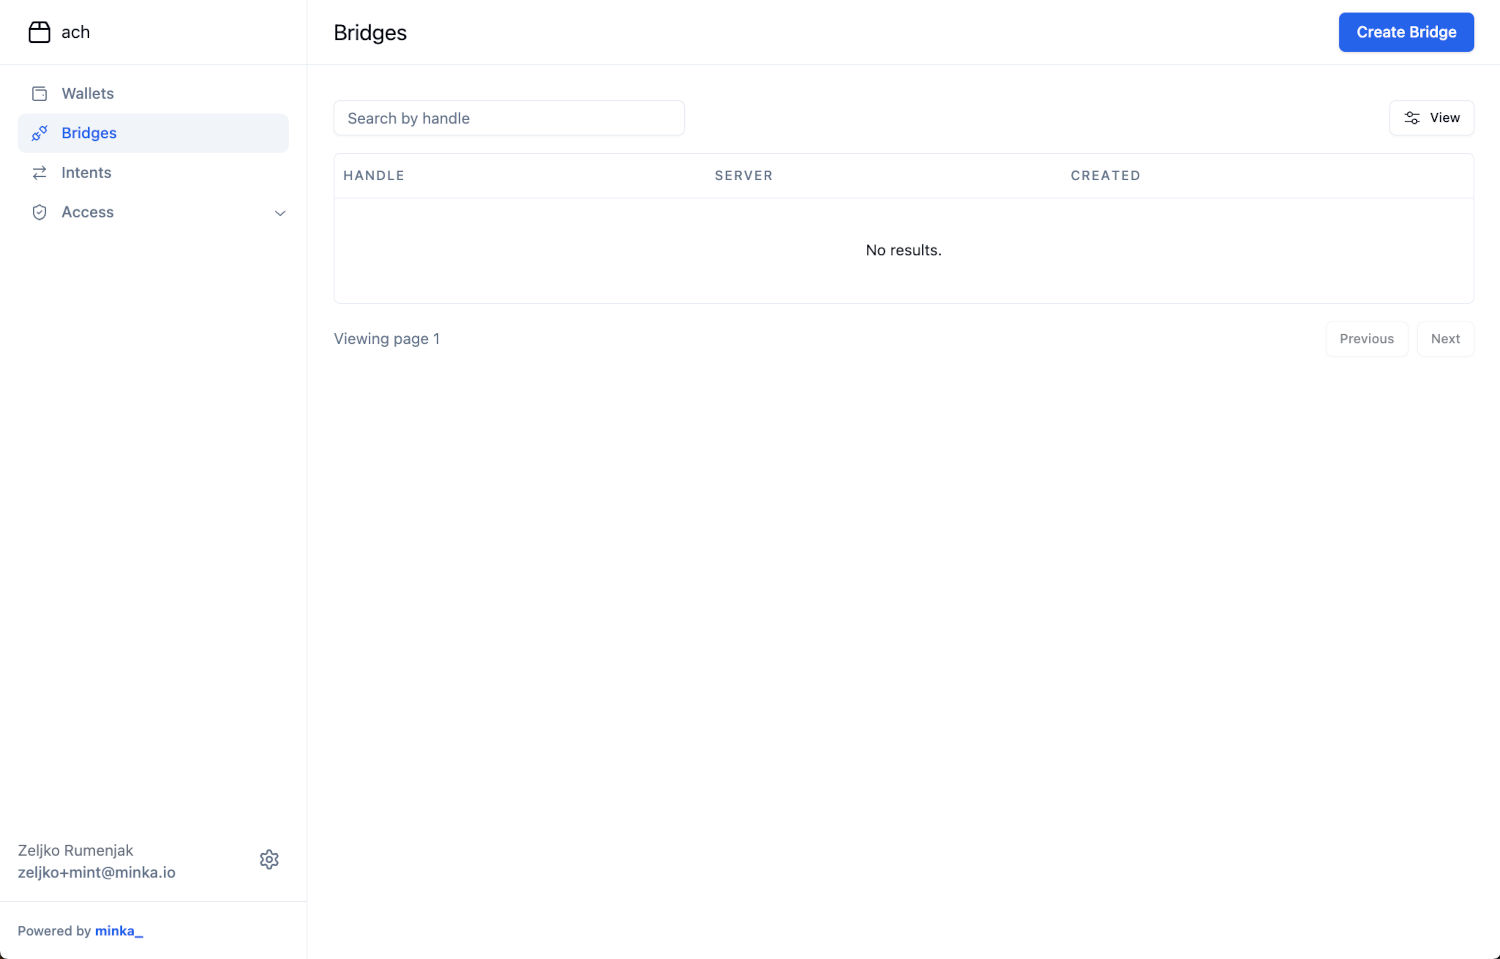
We can register a new bridge on the Bridges page in Studio by clicking on the Create Bridge button in the top left:
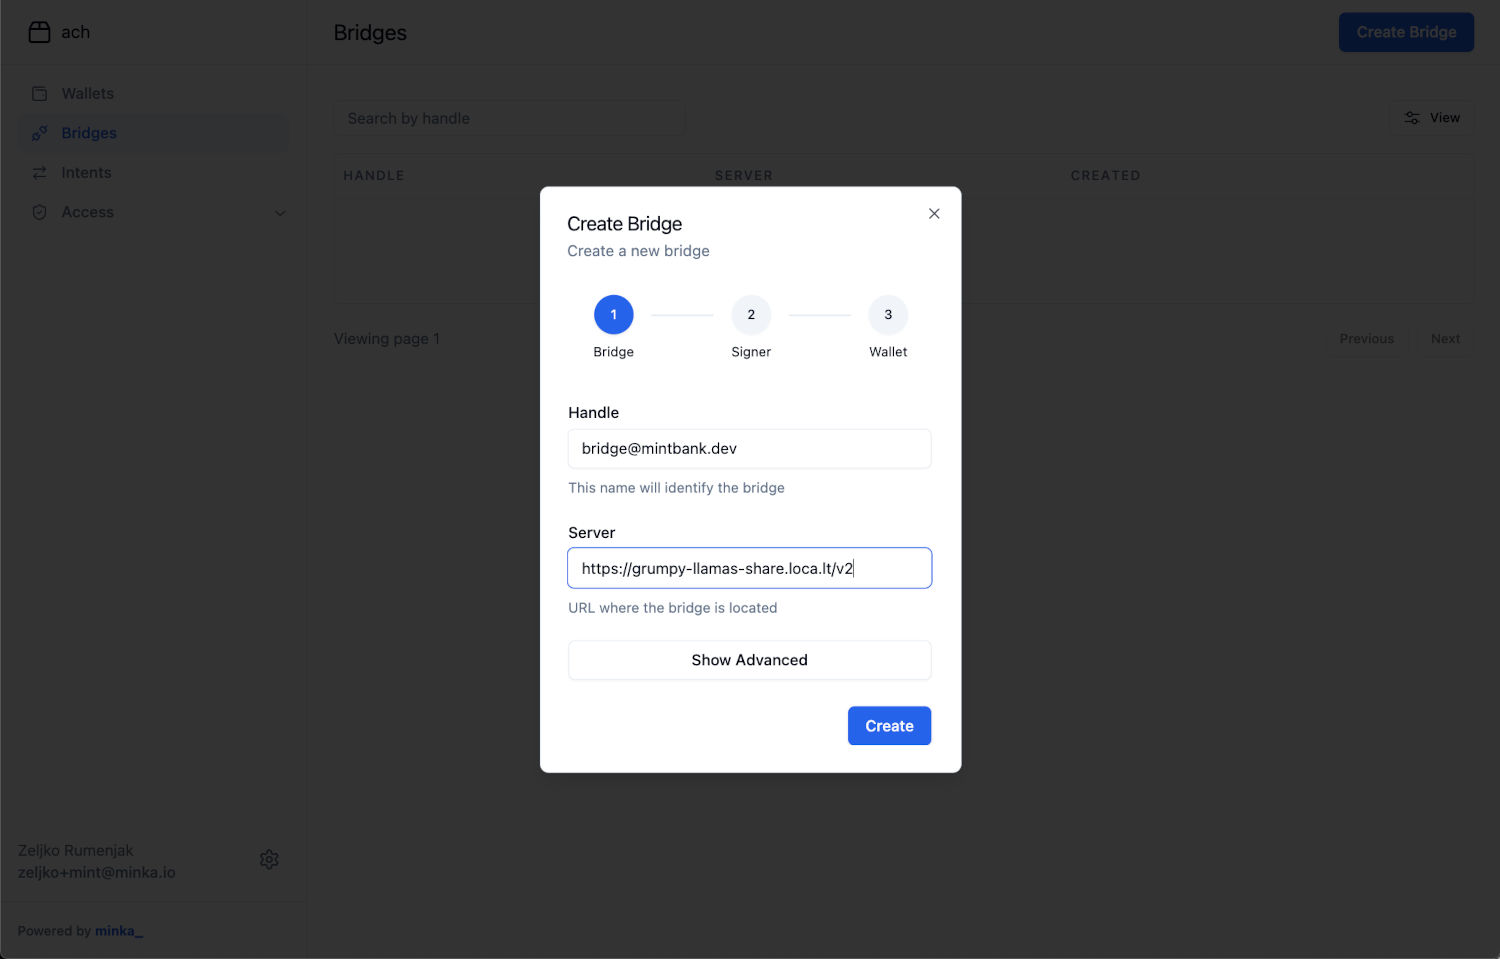
We need to define a unique name (handle) for our integration and we need to provide a server URL in the first step. For handle we will use bridge@mintbank.dev and we will use the Public URL that was printed by the minka bridge start command:
On the next step, we will register the public key of our bridge signer we have created earlier and assign it into a circle called bridge@mintbank.dev:
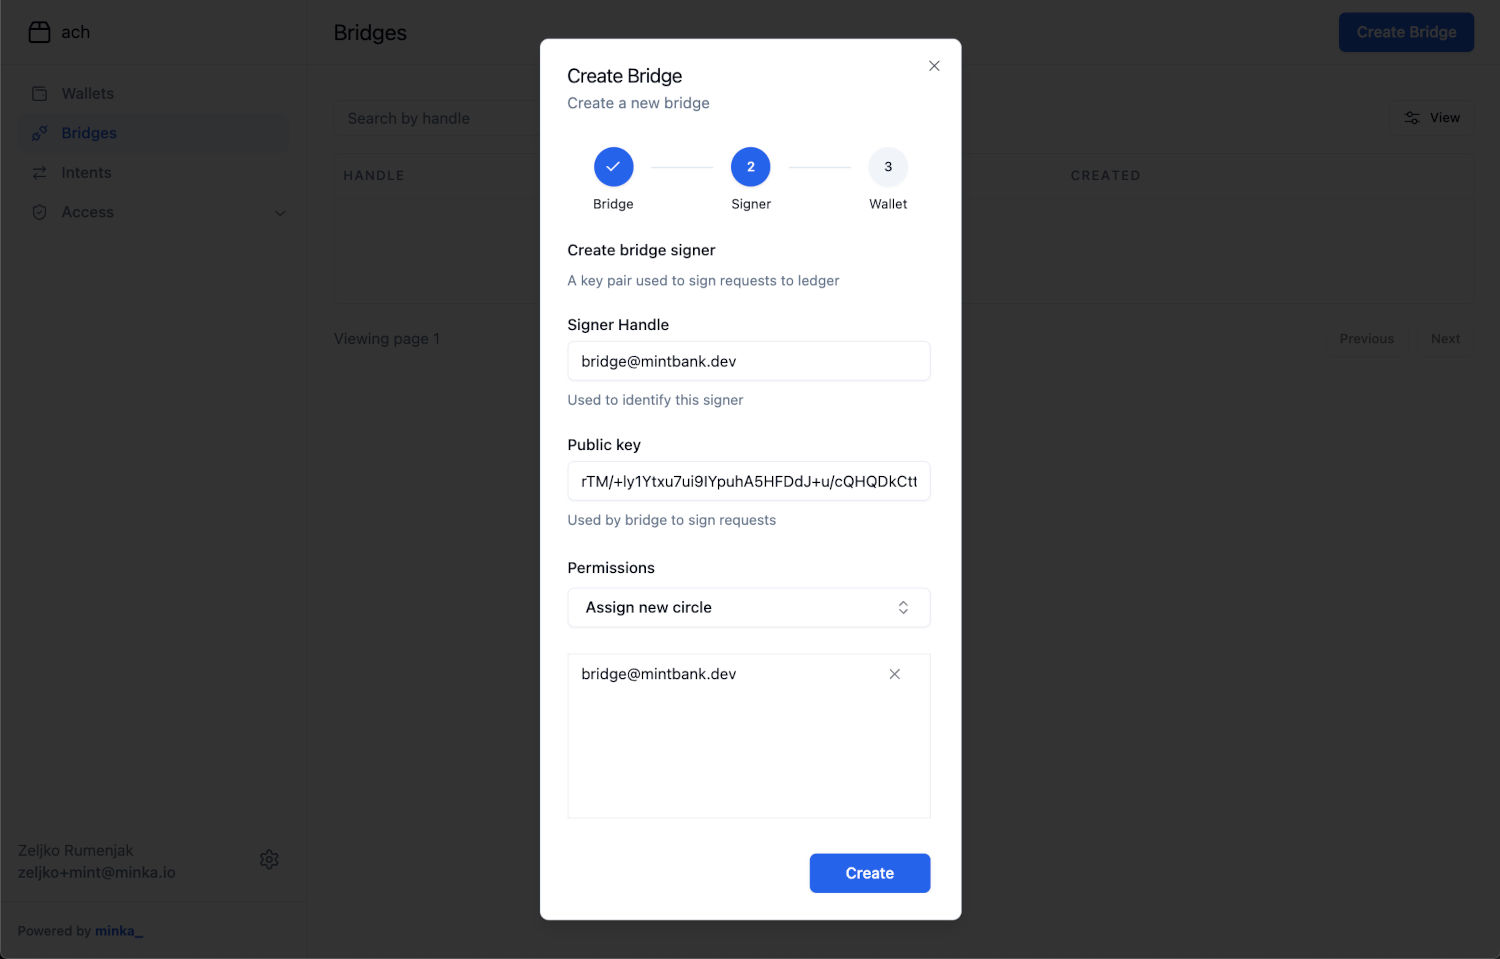
Circles are groups of signers, adding a signer to bridge@minkbank.dev circle will grant a set of permissions to this signer that a bridge needs in order to operate properly.
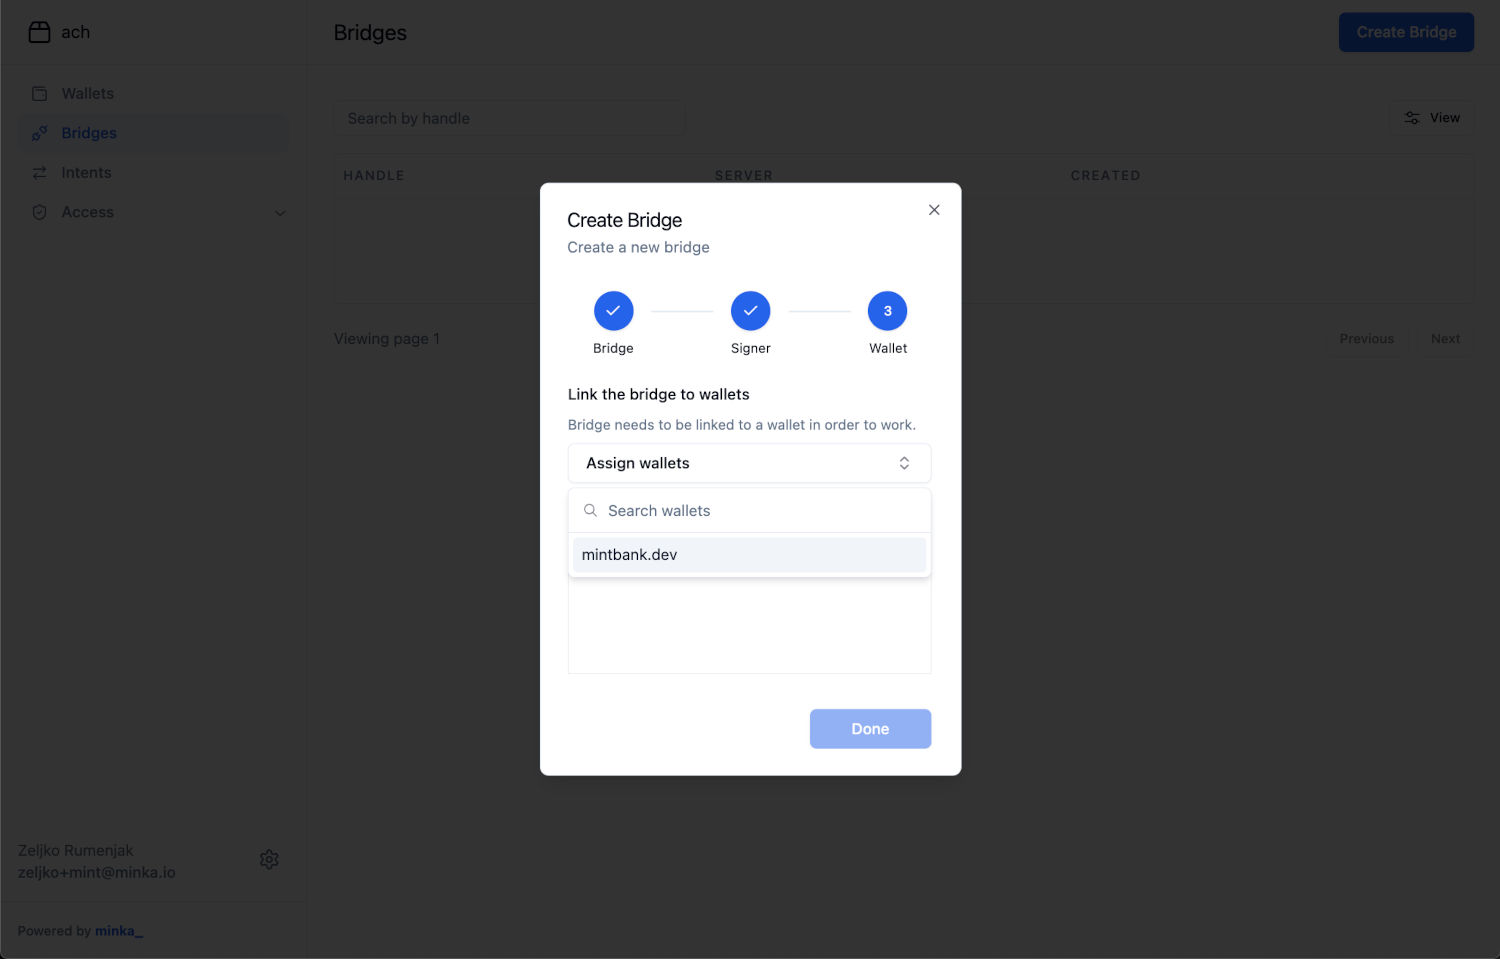
The last step is to link this bridge to our bank wallet mintbank.dev:
After we have done all this, our bridge is registered with ledger, the bridge signer will have all permissions required for a bridge service to operate and this bridge is assigned to our bank wallet. We can check the bridge is properly assigned by opening wallet details:
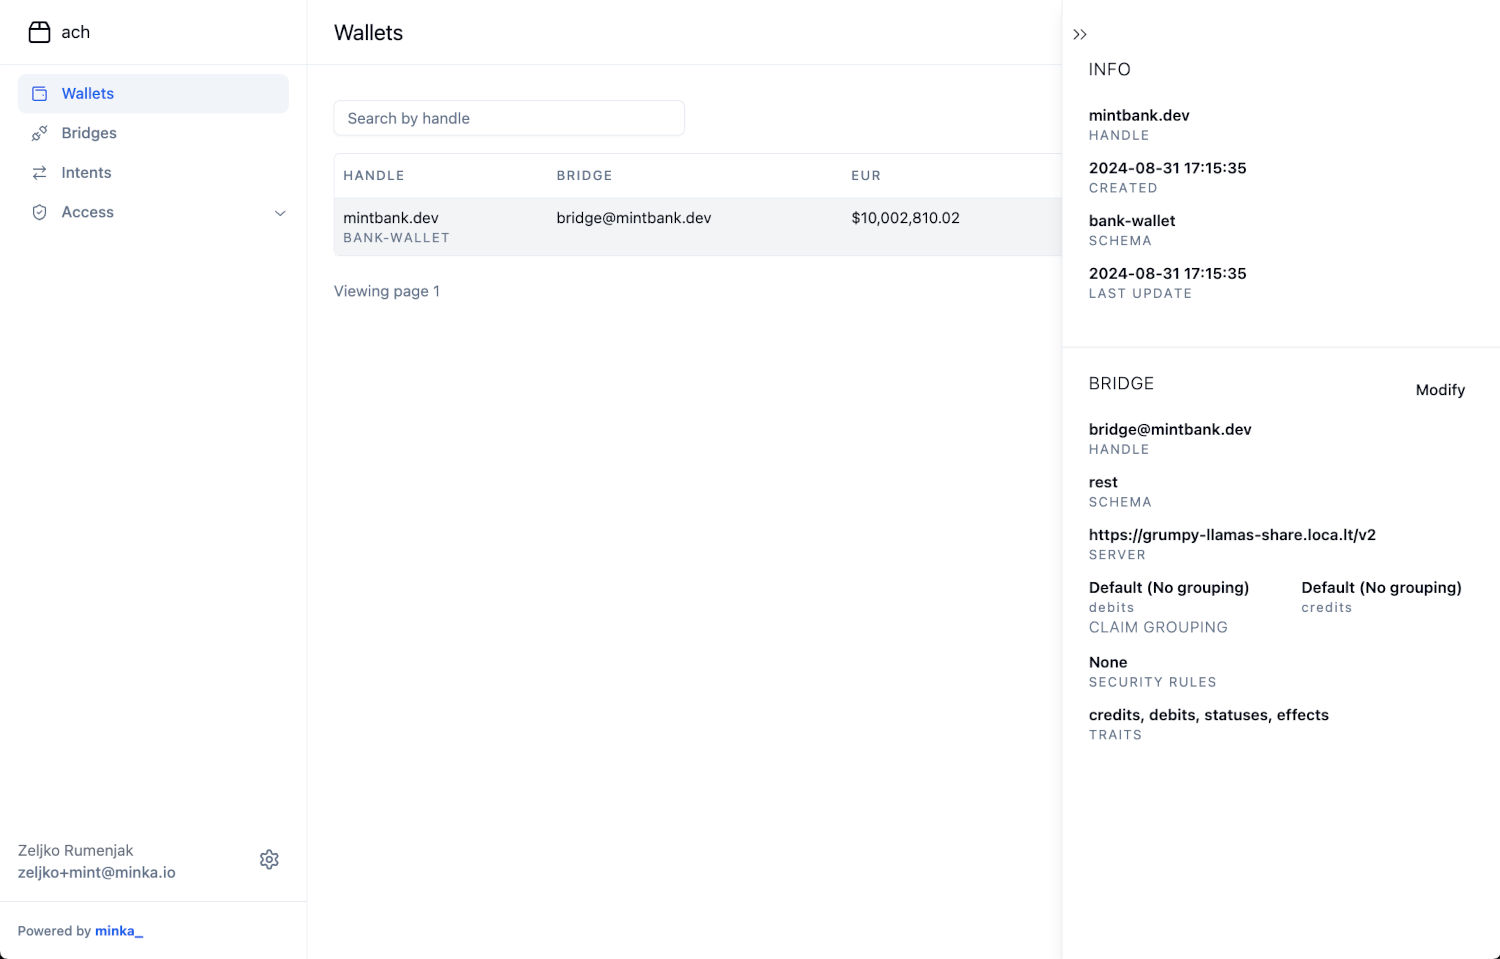
Assigning a bridge to a wallet means that this wallet is managed by an external authority. Before, all payment intents were processed on this wallet automatically. From now on, each wallet operation (debit or credit) is first going to be sent to our bridge for approval.
Payment intents are not going to be completed unless our bridge processes these operations in an external system and approves them by submitting required proofs to ledger. The algorithm that is used for synchronization of participants is called two phase commit. We will see how this process works in the next chapters.
We can now login with our bridge signer in the CLI:
$ minka ledger login

It seems you're currently logged in as teslabank
and you'll be logged out if you proceed with login

? Do you want to proceed? Yes
? Signer: bridge@mintbank.dev
? Signer password for bridge@mintbank.dev [hidden]

✅ Logged in as bridge@mintbank.dev.
Creating a payment intent
Let’s now see what happens if we create a new payment intent that needs to be credited in our bank. We will send a payment from Tesla Bank to our bank using the CLI. Leave the terminal window with our bridge running and open a new terminal to create this intent:
$ minka intent create -a
? Handle: k3PdrLoh1m1BnKlr0Kou7
? Schema: transfer
? Action: transfer
? Source: svgs:1001001345@teslabank.io
? Add custom data for source? Yes
? Field class: string
? Field title: name
? Field value: Nikola Tesla
? Add another field? Yes
? Field class: string
? Field title: entityType
? Field value: individual
? Add another field? Yes
? Field class: string
? Field title: idType
? Field value: nidn
? Add another field? Yes
? Field class: string
? Field title: idNumber
? Field value: 429493434
? Add another field? No
? Target: svgs:1001009422@mintbank.dev
? Add custom data for target? Yes
? Field class: string
? Field title: name
? Field value: John Locke
? Add another field? Yes
? Field class: string
? Field title: entityType
? Field value: individual
? Add another field? Yes
? Field class: string
? Field title: idType
? Field value: nidn
? Add another field? Yes
? Field class: string
? Field title: idNumber
? Field value: 58252939
? Add another field? No
? Symbol: usd
? Add custom data for symbol? No
? Amount: 8.15
? Add custom data for this action? No
? Add another action? No
? Attach a policy? No
? Intent commit mode: auto
? Add custom data for this intent? Yes
? Field class: string
? Field title: description
? Field value: Credit to CLI bridge
? Add another field? No
? Signers: teslabank
? Signer password for teslabank [hidden]

Intent summary:
---------------------------------------------------------------------------
Handle: k3PdrLoh1m1BnKlr0Kou7
Schema: transfer

Action: transfer
 - Source: svgs:1001001345@teslabank.io
   Custom (source):
     - name: Nikola Tesla
     - entityType: individual
     - idType: nidn
     - idNumber: 429493434
 - Target: svgs:1001009422@mintbank.dev
   Custom (target):
     - name: John Locke
     - entityType: individual
     - idType: nidn
     - idNumber: 58252939
 - Symbol: usd
 - Amount: $8.15

Custom (intent):
  - description: Credit to CLI bridge

? Sign this intent using signer teslabank? Yes

✅ Intent signed and sent to ledger ach
Luid: $int.J_aEewQhDExOgZQ-3
Intent status: pending
After creating the intent you will immediately see that a new request is received in our bridge console:
Waiting for new requests...
prepare-credit for intent JppaY7Rd4irkbXwmgB7Xm received:
---------------------------------------------------------------------------
- Source: svgs:1001001345@teslabank.io
Custom (source):
- name: Nikola Tesla
- idType: nidn
- idNumber: 429493434
- entityType: individual
- Target: svgs:1001009422@mintbank.dev
Custom (target):
- name: John Locke
- idType: nidn
- idNumber: 58252939
- entityType: individual
- Amount: $8.15
- Symbol: usd
---------------------------------------------------------------------------
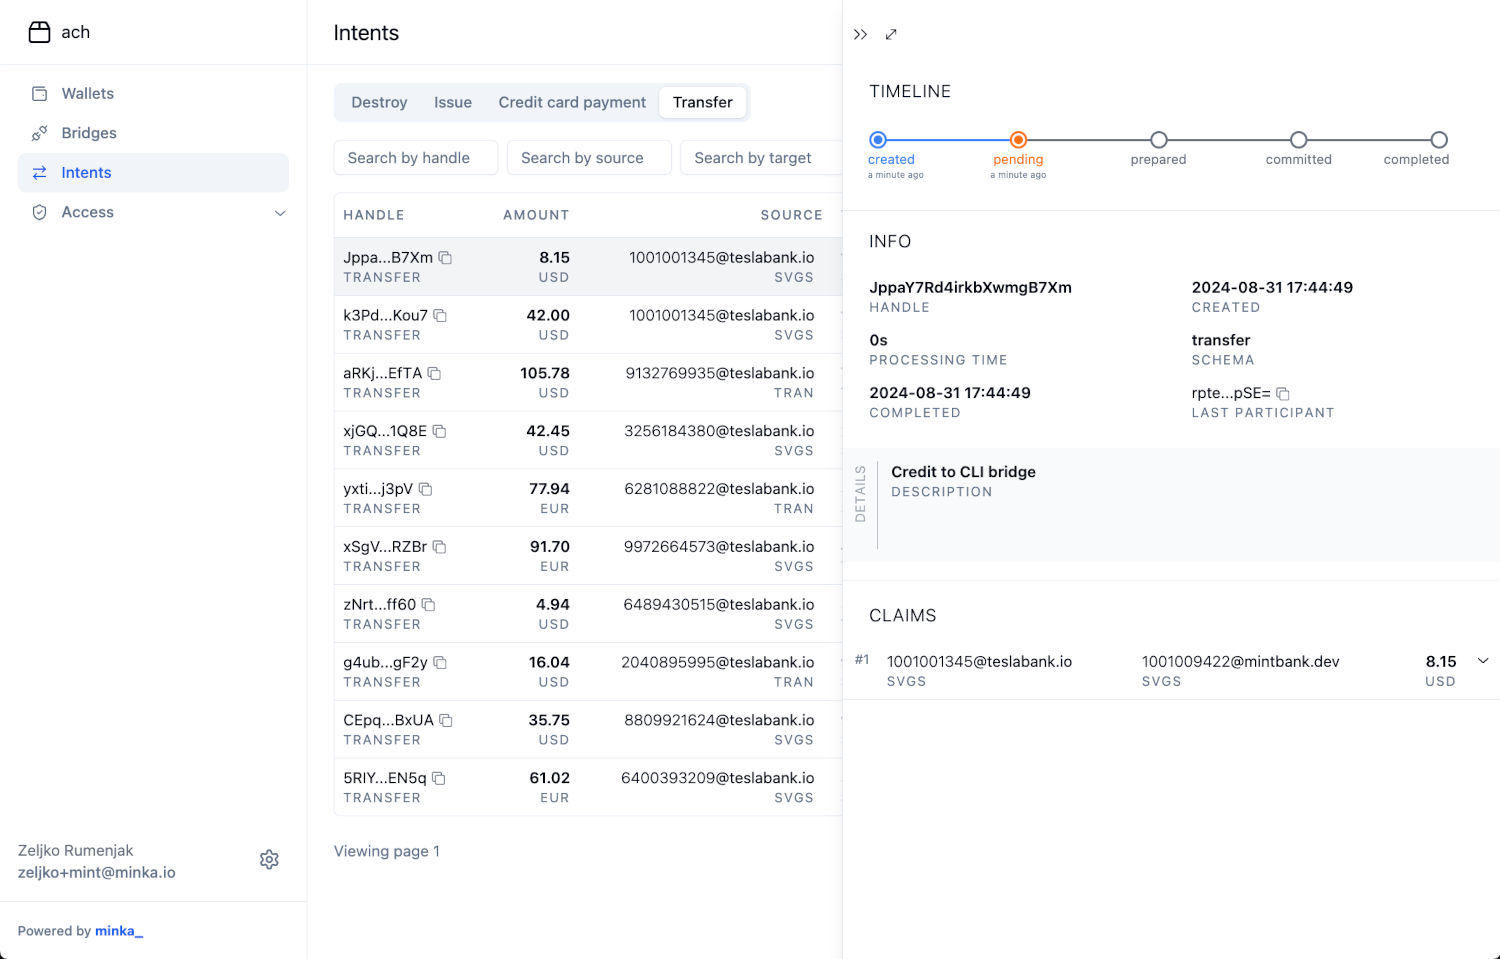
? Type p to prepare, f to fail, r to enter REPL shell, j to print JSON body, or i to ignore: (Pfrjih)We can also open this intent in Studio to see that it is waiting in the status pending until we continue the process in our bridge:
Preparing a credit
This request is part of a two phase commit protocol that ledger uses in order to ensure that all participants in a distributed transaction correctly perform their responsibilities. Confirmations sent to ledger must be the proofs made with a private key registered with the bridge and contain a transaction reference (coreId) of the operation performed by the bridge as evidence.
The protocol has two phases: a prepare phase and a commit phase. The prepare phase should validate and ensure that an operation can be executed, but an operation isn’t considered completed until a commit or abort request is received from the ledger.
For the credit operation we would validate that the target account information matches our records, that the account is active and other similar checks. Once we performs all the validations we need to confirm this to the ledger by sending a proof. Let’s send this proof to ledger by typing p in our bridge terminal:
Waiting for new requests...

prepare-credit for intent JppaY7Rd4irkbXwmgB7Xm received:
---------------------------------------------------------------------------
 - Source: svgs:1001001345@teslabank.io
   Custom (source):
     - name: Nikola Tesla
     - idType: nidn
     - idNumber: 429493434
     - entityType: individual
 - Target: svgs:1001009422@mintbank.dev
   Custom (target):
     - name: John Locke
     - idType: nidn
     - idNumber: 58252939
     - entityType: individual
 - Amount: $8.15
 - Symbol: usd
---------------------------------------------------------------------------

? Type p to prepare, f to fail, r to enter REPL shell, j to print JSON body,
or i to ignore: Prepare
? Core Id:
> Credit prepared, reply sent to ledger ✔

update for intent JppaY7Rd4irkbXwmgB7Xm received:
---------------------------------------------------------------------------
 - Status: prepared  [received intent status]
---------------------------------------------------------------------------
We have left the coreId empty in the example above because we didn’t perform any core transactions, we only validated the data. In case of credits, we usually don’t want to perform a balance movement to the target account. If we did, the user would see a balance in their account and could use it before the transaction is confirmed by all participants.
We can now check what happened with our intent in the Studio by refreshing the page:
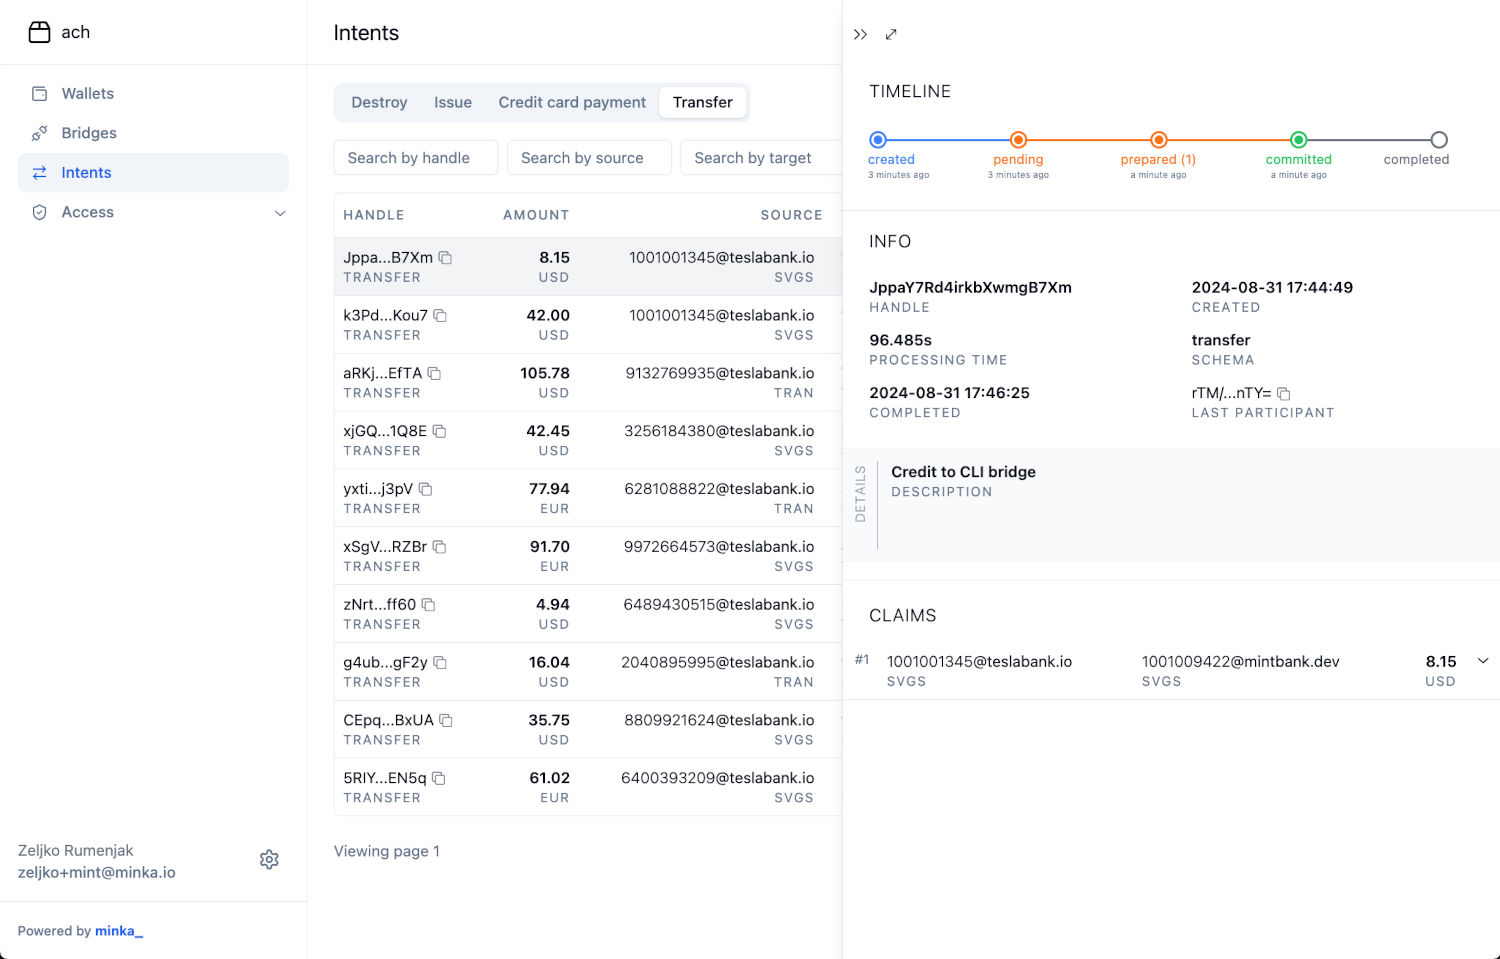
The intent is now in the status committed and that it says prepared (1) as well in the timeline. This means that this intent was prepared by one participant. Our Tesla Bank doesn’t have a bridge configured, so only we need to prepare this intent. Based on this, once we sent our prepare proof, the intent was fully prepared and the ledger proceeded to the second phase, commit.
Committing a credit
Intent status reflects the two phase commit protocol rules. Once all participants successfully prepare an intent, it moves immediately to committed. The second phase of the protocol is initiated by a centralized authority called a distributed transaction coordinator. Ledger performs this role and it automatically commits the intent once required conditions are met.
The second phase of the protocol requires participants to only confirm the operation, they cannot change the outcome. Commit operation must always succeed, commit phase cannot be aborted or fail. In case of any failures, it is the responsibility of the participant to resolve them and recover.
When processing a commit credit call we know that the intent is already committed by the ledger, so it is safe to transfer the funds to the target account. We need to credit the user account and send a unique reference (coreId) of this operation as proof to ledger:
commit-credit for intent JppaY7Rd4irkbXwmgB7Xm received:
---------------------------------------------------------------------------
 - Source: svgs:1001001345@teslabank.io
   Custom (source):
     - name: Nikola Tesla
     - idType: nidn
     - idNumber: 429493434
     - entityType: individual
 - Target: svgs:1001009422@mintbank.dev
   Custom (target):
     - name: John Locke
     - idType: nidn
     - idNumber: 58252939
     - entityType: individual
 - Amount: $8.15
 - Symbol: usd
---------------------------------------------------------------------------

? Type c to confirm, r to enter REPL shell, j to print JSON body,
or i to ignore: Confirm
? Core Id: mint.39dj93
> Credit committed, reply sent to ledger ✔

update for intent JppaY7Rd4irkbXwmgB7Xm received:
---------------------------------------------------------------------------
 - Status: completed  [received intent status]
---------------------------------------------------------------------------
After sending this proof the intent changes to completed, because all participants have confirmed the commit. We can check the intent status again in the Studio to see this change as well:
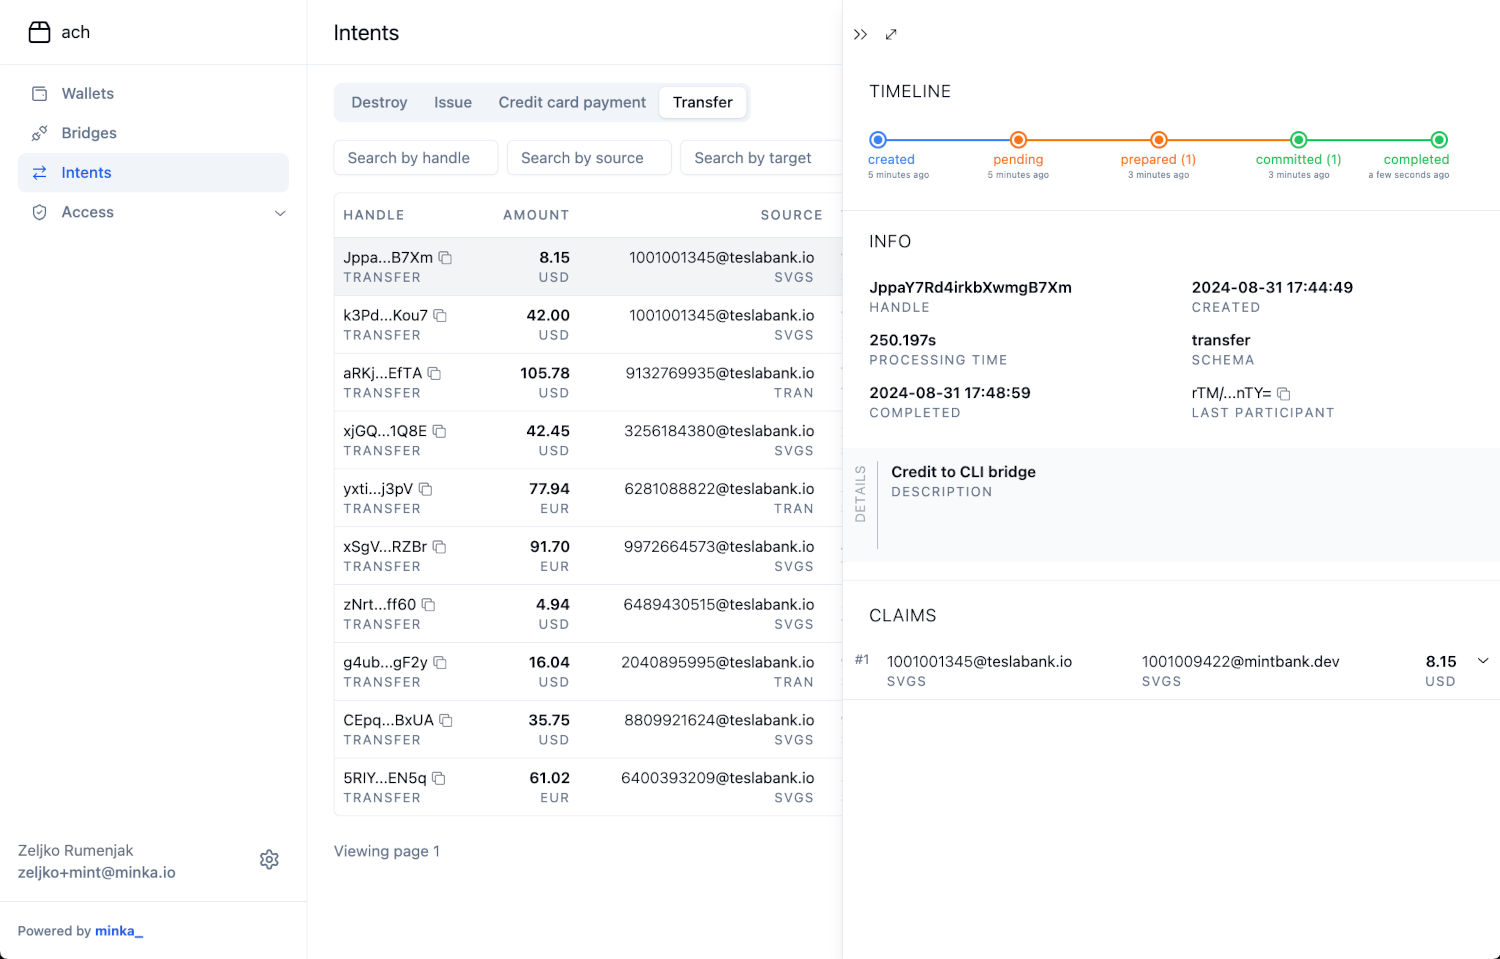
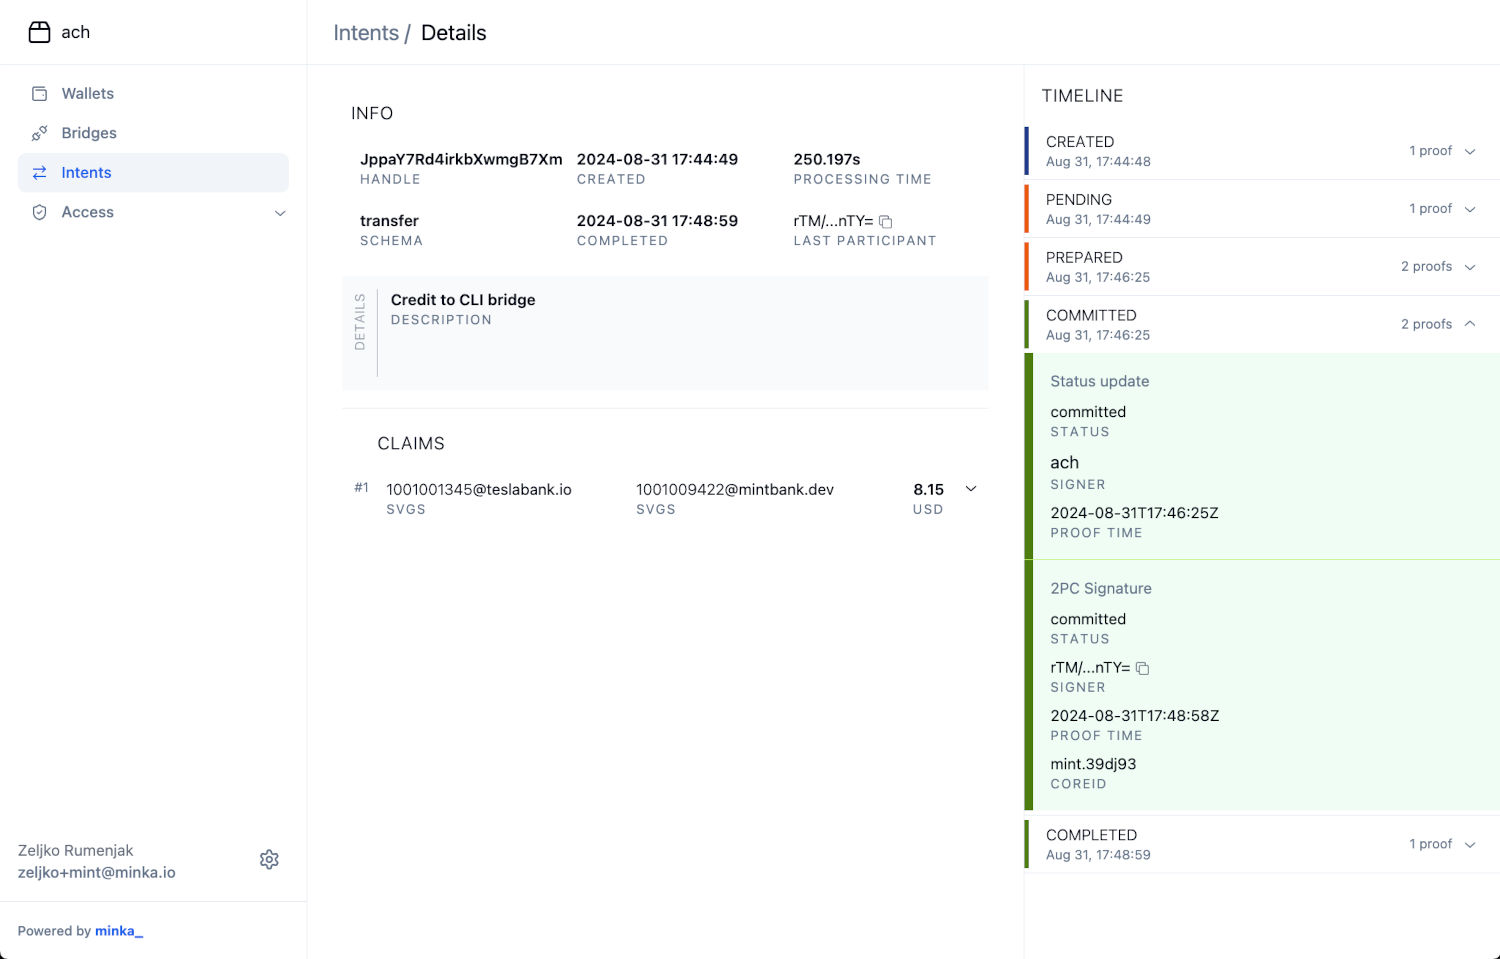
We can also examine intent proofs in more detail if we open the full intent details page. For example, the committed status shows that the intent was first committed by the ledger and that we have confirmed it by sending the 2PC signature with a core id:
Aborting a credit
Previously we have created a successful intent, in this chapter we will create another intent like the first one, but we will fail the prepare step to see how the flow looks like in case of errors.
We can create an intent similar to the first one, we changed the amount and description only to make it easier to tell them apart:
$ minka intent create -a
? Handle: nLB3Gvjs8EWNykVCyiTFp
? Schema: transfer
? Action: transfer
? Source: svgs:1001001345@teslabank.io
? Add custom data for source? Yes
? Field class: string
? Field title: name
? Field value: Nikola Tesla
? Add another field? Yes
? Field class: string
? Field title: entityType
? Field value: individual
? Add another field? Yes
? Field class: string
? Field title: idType
? Field value: nidn
? Add another field? Yes
? Field class: string
? Field title: idNumber
? Field value: 429493434
? Add another field? No
? Target: svgs:1001009422@mintbank.dev
? Add custom data for target? Yes
? Field class: string
? Field title: name
? Field value: John Locke
? Add another field? Yes
? Field class: string
? Field title: entityType
? Field value: individual
? Add another field? Yes
? Field class: string
? Field title: idType
? Field value: nidn
? Add another field? Yes
? Field class: string
? Field title: idNumber
? Field value: 58252939
? Add another field? No
? Symbol: usd
? Add custom data for symbol? No
? Amount: 16
? Add custom data for this action? No
? Add another action? No
? Attach a policy? No
? Intent commit mode: auto
? Add custom data for this intent? Yes
? Field class: string
? Field title: description
? Field value: Aborted intent
? Add another field? No
? Signers: teslabank
? Signer password for teslabank [hidden]

Intent summary:
---------------------------------------------------------------------------
Handle: nLB3Gvjs8EWNykVCyiTFp
Schema: transfer

Action: transfer
 - Source: svgs:1001001345@teslabank.io
   Custom (source):
     - name: Nikola Tesla
     - entityType: individual
     - idType: nidn
     - idNumber: 429493434
 - Target: svgs:1001009422@mintbank.dev
   Custom (target):
     - name: John Locke
     - entityType: individual
     - idType: nidn
     - idNumber: 58252939
 - Symbol: usd
 - Amount: $16.00

Custom (intent):
  - description: Aborted intent

? Sign this intent using signer teslabank? Yes

✅ Intent signed and sent to ledger ach
Luid: $int.o56W5ANOUk4KI0hzA
Intent status: pending
In the bridge console we will get a prepare credit again, but now we will fail it:
prepare-credit for intent nLB3Gvjs8EWNykVCyiTFp received:
---------------------------------------------------------------------------
 - Source: svgs:1001001345@teslabank.io
   Custom (source):
     - name: Nikola Tesla
     - idType: nidn
     - idNumber: 429493434
     - entityType: individual
 - Target: svgs:1001009422@mintbank.dev
   Custom (target):
     - name: John Locke
     - idType: nidn
     - idNumber: 58252939
     - entityType: individual
 - Amount: $16.00
 - Symbol: usd
---------------------------------------------------------------------------

? Type p to prepare, f to fail, r to enter REPL shell, j to print JSON body,
or i to ignore: Fail
? Core Id:
> Credit failed, reply sent to ledger ✔
After receiving the failed proof, ledger is going to proceed with aborting this intent. Ledger notifies all participants that the intent has been aborted, and they need to reverse any operations they have performed for this intent. Our bridge will get an abort credit call:
abort-credit for intent nLB3Gvjs8EWNykVCyiTFp received:
---------------------------------------------------------------------------
 - Source: svgs:1001001345@teslabank.io
   Custom (source):
     - name: Nikola Tesla
     - idType: nidn
     - idNumber: 429493434
     - entityType: individual
 - Target: svgs:1001009422@mintbank.dev
   Custom (target):
     - name: John Locke
     - idType: nidn
     - idNumber: 58252939
     - entityType: individual
 - Amount: $16.00
 - Symbol: usd
---------------------------------------------------------------------------

Error
 - Reason: core.bridge-prepare-failed
 - Detail: Bridge(s) failed to process intent: bridge@mintbank.dev
 - Caused by
   - Reason: bridge.entry-rejected
   - Detail: Entry was manually rejected by the bridge

---------------------------------------------------------------------------

? Type c to confirm, r to enter REPL shell, j to print JSON body,
or i to ignore: Confirm
? Core Id: mint.309332
> Credit aborted, reply sent to ledger ✔

update for intent nLB3Gvjs8EWNykVCyiTFp received:
---------------------------------------------------------------------------
 - Status: rejected  [received intent status]
---------------------------------------------------------------------------

Error
 - Reason: core.bridge-prepare-failed
 - Detail: Bridge(s) failed to process intent: bridge@mintbank.dev
 - Caused by
   - Reason: bridge.entry-rejected
   - Detail: Entry was manually rejected by the bridge

---------------------------------------------------------------------------
In the abort credit we should clean up any side-effects from prepare credit. We didn’t make any balance movements, so there is nothing we need to reverse here.
We can check how our intent looks like in Studio as well:
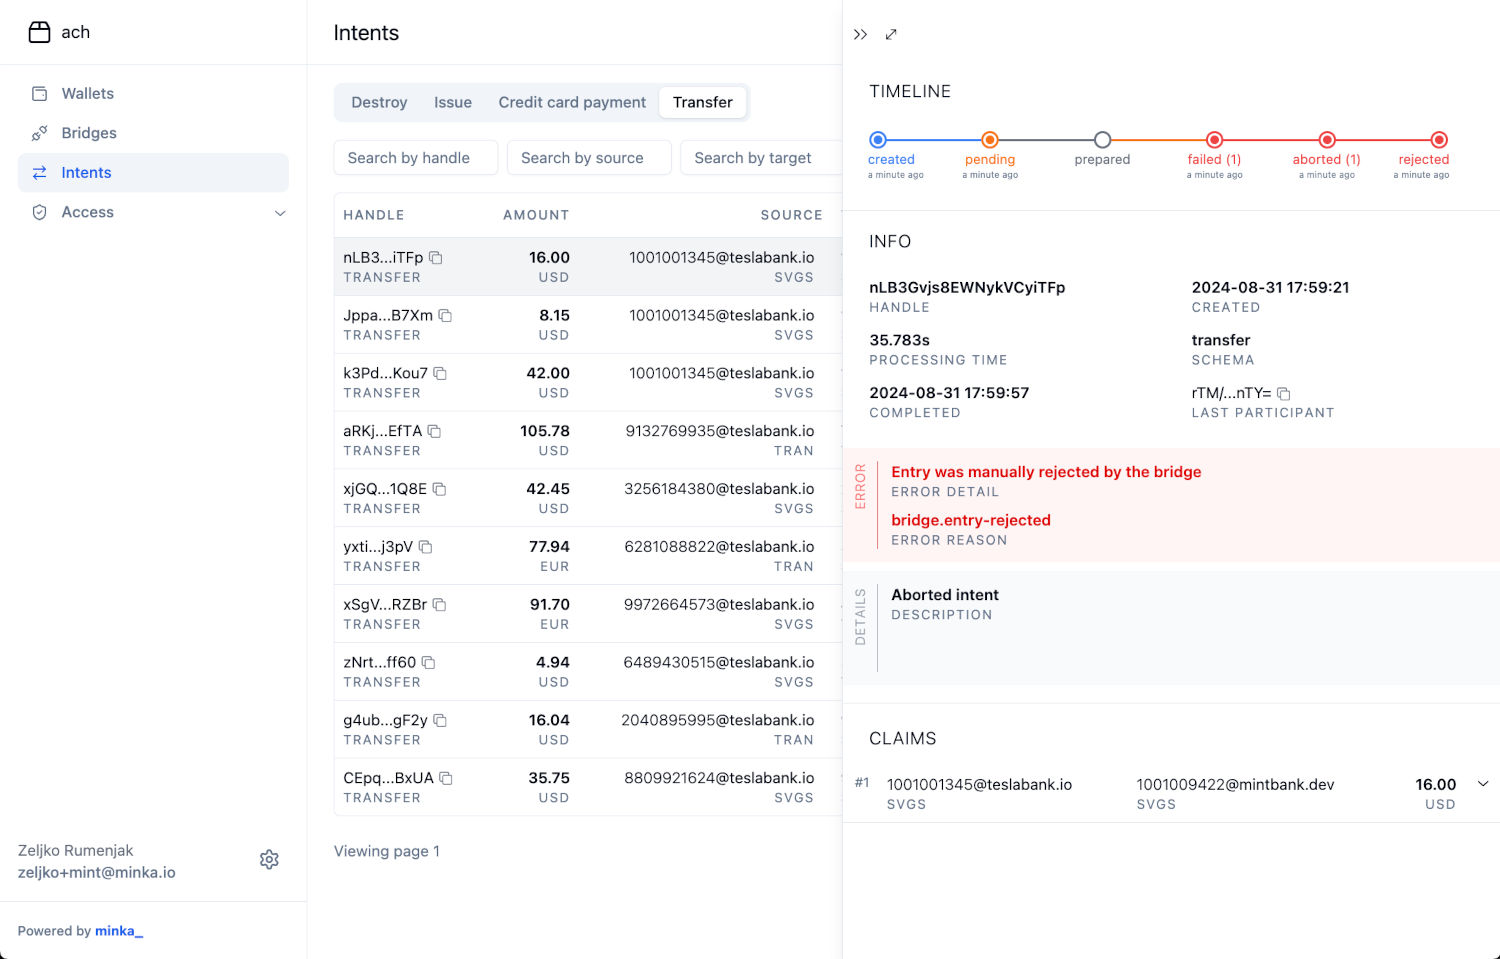
The Studio shows that intent was not prepared, that we have received a single failed, and a single aborted proof.
We can examine these proofs in more detail by opening the Intent Details page:
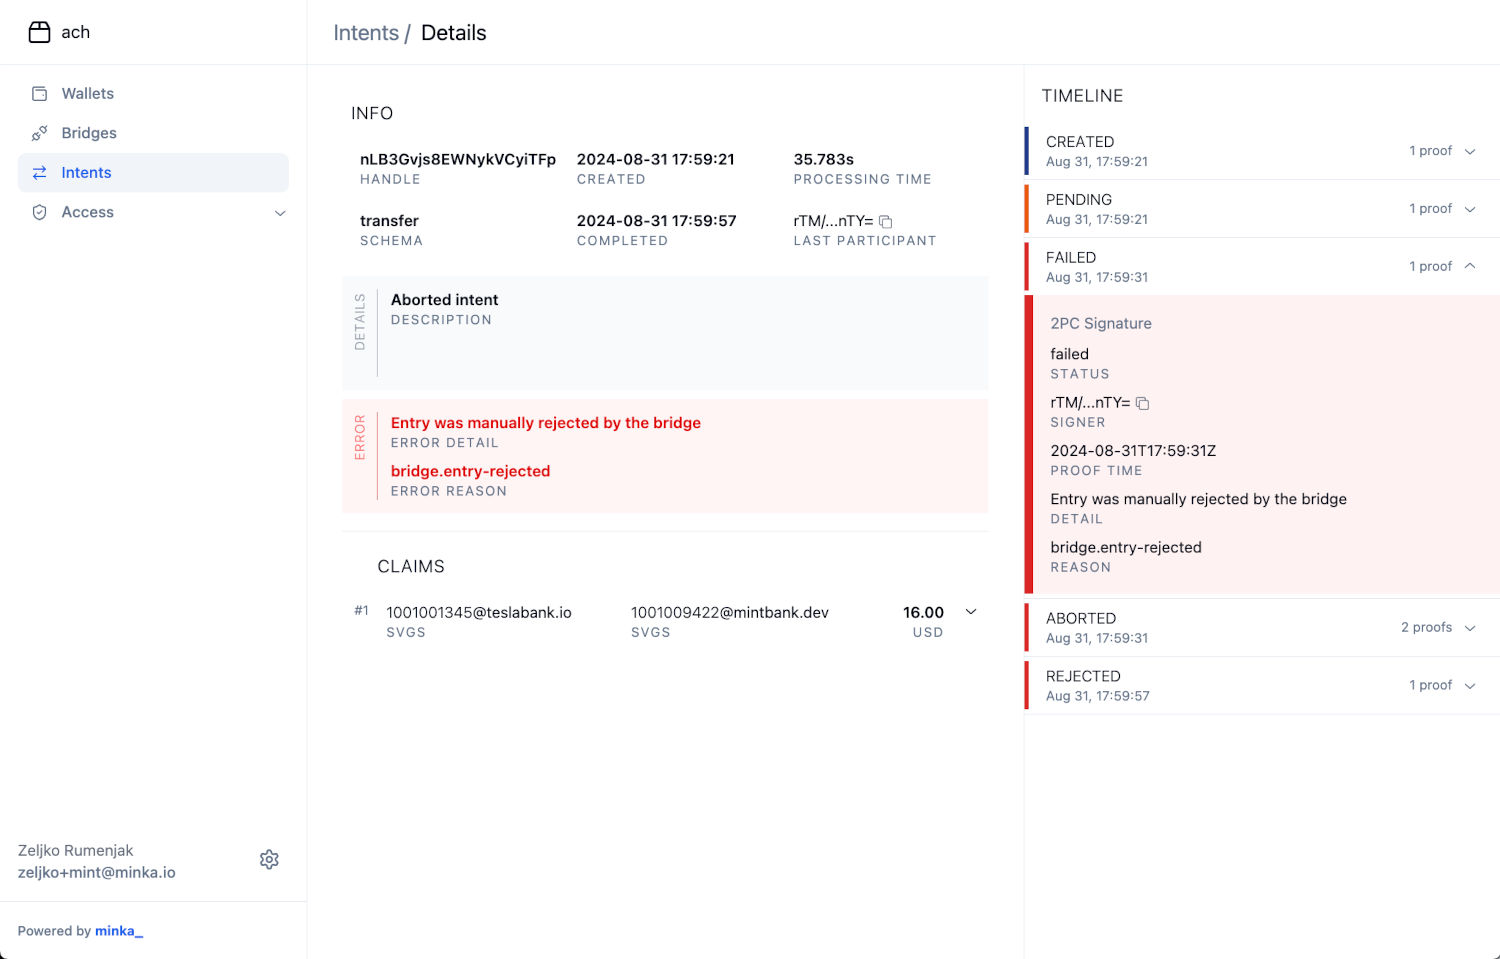
Each proof that failed with some error contains all error details and a core id, if a core operation was performed. The error shown on the intent (left side) is the latest error that happened for this intent.
What’s next?
In this tutorial we have connected a local bridge to ledger and learned more about the two phase commit protocol for synchronizing balance movements between financial systems. You can create more intents and test various other situations using the tools we have shown in this tutorial.
We didn’t show how debit operations work, you can check this on your own. The debit operation works the same way as credits, but there are some differences in the logic which your integration needs to do in each phase. For example, prepare debit should reserve funds from the source account, while prepare credit only validates.
We will dive deeper into those specifics in next tutorials which show you how to implement a bridge service in NodeJs.