Ledger basic setup
Ledger basic setup
In this section, we will create a ledger, setup its basic security and authorization, and create additional signers and wallets.
Creating a ledger
In this sandbox, we will now setup our own ledger using ledger-creator signer.
minka ledger createYou will have to input the name (handle) you would like to use for your ledger - layout-ledger.
Set access rules to this:
[
  {
    "action": "access"
  },
  {
    "action": "any",
    "record": "any",
    "signer": {
      "$ledger": "owner"
    }
  },
  {
    "action": "read",
    "record": "any",
    "bearer": {
      "$signer": {
        "$ledger": "owner"
      }
    }
  }
]
This translates to:
- grant pass-through access for ledger to everyone
- the owner of the ledger can perform any action on any record (by signing the
datapart of the request) - the owner of the ledger can read any record on the ledger (by using JWT bearer token)
Leave the rest of the fields as default. Use ledger-creator signer to create the ledger.
Applying the layout
This tutorial heavily relies on applying layouts from the file. To apply the layout from the file, use the following command:
minka layout apply --localYou will use this command throughout the tutorial, with different layout files. More details about the layout apply command can be found in the How to apply a layout documentation.
Creating additional signers on the ledger
For the purpose of this tutorial, we will create three additional signers on the ledger:
tesla-signer- signer that will be used to create Tesla wallet, which will represent a Tesla bank accountminka-signer- signer that will be used to create Minka wallet, which will represent a Minka bank accountach-signer- signer that will be used to create ACH wallet, which will represent ACH
For that, we will use a layout file that is already created for us. It will create three signers on the ledger. Download the signers.json layout file and apply it.
Looking at the layout, we can see that the following applies:
- Only owner can see its data and update it.
- Password for each signer is the same as the signer's handle root name. For example,
tesla-signersigner has passwordtesla.
The password is only used to encrypt the signer's private key when it is stored. API requests are authenticated with digital signatures or JWTs created with the private key, and verified using the public key. The password is never used for request authentication.
Define default-policy policy
Policies in Minka are reusable sets of access rules that can be applied to records, to control who can perform what actions. They serve as templates for access control. So, instead of duplicating the same access rules everywhere, we can create a policy and reference it in multiple places.
First policy we will create in this tutorial is the default-policy policy. It contains the default access rules we want to have for the majority of the records, and as the base policy for other policies. This policy establishes the following access rules:
- Record owners can perform any action on their records
- Record owners can read their records using a bearer token
- Ledger owners can read any record using a bearer token
- Ledger owners can spend from any wallet using a bearer token
- Members of the
ach-circlecircle can read records using a bearer token (circle is basically a group of signers, we will create it later)
To create the policy, download the default-policy.json layout file and apply it.
For more detailed information about policies and their implementation, refer to the About Security Policies documentation.
Circles
Circles in Minka are groups or roles that contain multiple signers. They serve as a way to organize signers and simplify access control management across the ledger. Instead of granting permissions to individual signers (which can become complex with many users), you can assign permissions to entire circles.
For a detailed explanation of circles and how they work with authorization, see About Circles and About Authorization.
For the sake of assigning policies to signers, we will create the following circles:
bank-circle- circle that will contain bank signers -tesla-signerandminka-signerach-circle- circle that will contain ACH signer -ach-signer
Regarding access rules - each circle will have access rules defined by default-policy policy.
Also, layout functionality allows us to define the members of the circle. bank-circle will contain tesla-signer and minka-signer signers, and ach-circle will contain ach-signer signer.
To create these circles on the ledger, download the circles.json layout file and apply it.
Wallets
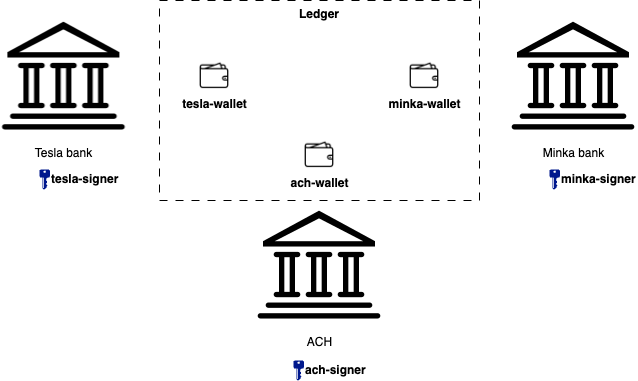
Wallets in Minka are accounts that are used for transactions and balances. For our purposes, we will create three wallets that will represent banks:
ach-wallet- wallet that will represent ACHtesla-wallet- wallet that will represent Tesla bankminka-wallet- wallet that will represent Minka bank
When creating a wallet, we will be using a new ledger entity, called schema - this will be explained in more detail in the next section.
Schemas for wallets
Schemas in Minka are templates for data that is stored on the ledger. They define the structure of the record data that is stored on the ledger - what fields are required, what fields are optional, possible values in terms of type, set of possible values, regular expressions, etc. They are executed when a record is created or updated. Often, they are used simply as a way to group records together, for organization, readability, and filtering purposes.
We will create two schemas for wallets:
tel-alias-schema- Schema for wallet records which defines that data should simply be an object and have ahandlefield that should be a string and start withtel:. This schema will be used for defining wallets that are associated with tel aliases.bank-wallet-schema- Schema for wallet records which defines that data should simply be an object. This schema will be used for defining wallets that are associated with bank accounts.
To create the schemas for wallets, download the wallets-schemas.json layout file and apply it.
Creating wallets
Now the schemas are created, we can use them when creating wallets. To create the wallets, download the wallets.json layout file and apply it.
bank-wallet-schema schema and default-policy access policy is used for all three wallets. Additionally, each wallet is signed by the respective bank signer, what makes these bank signers the owners of these bank wallets.
Symbols
Symbols in Minka are units of value that are used to represent different currencies.
For the sake of this tutorial, we will create two symbols:
usd- symbol that will represent US dollarsdop- symbol that will represent Dominican pesos
Both symbols will use default-policy access policy. They will be signed by the ach-signer signer, making ach-signer signer the owner of these symbols.
Also, we will use factor field to define the factor for the symbol. Transaction amount is always integer, so factor is used to define the decimal places for the symbol.
In this case, we will use 100, which means that 1 unit of the symbol will be equal to 100 units of the base symbol. In other words, 1 unit of the symbol is 100 cents.
To create the symbols, download the symbols.json layout file and apply it.
Intent schemas, policies, and initial intents
Intents in Minka are requests for actions that are sent to the ledger. They are usually used to create new money in the ledger, transfer money between wallets, destroy money, etc.
As we have done for other records, we will define schemas and policies for intents as well. After that, we will create initial intents that will be used to create the initial money in the ledger.
Intent schemas
To group intents by their purpose, we will create two schemas:
p2p-intent-schema- Schema for intent records which defines that data should simply be an object. It will be used for P2P payments.intent-schema- Schema for intent records which defines that data should simply be an object. This one will be used for general intent records.
To create the schemas, download the intents-schemas.json layout file and apply it.
Intent policies
We will create the p2p-intent-policy policy, which will be used for P2P payment intents. Its properties are:
- It is an access policy
- It extends the
default-policypolicy - It will be applied only to
intent-schematype records - Its access policy is defined by the
default-policypolicy - It adds the following access rules for the record it is applied to:
- Bank circle members can read P2P intents: Any signer in the
bank-circlecircle can read intents with schemap2p-intent-schemaif they are allowed to read any of the wallets involved in any claim of this intent assourceortarget(requires JWT bearer token). - Bank members can read related P2P intents: Any signer in the
bank-circlecircle can read intents with schemap2p-intent-schemaif they are allowed to read any of the wallets involved in any claim of the thread that this intent is part of - assourceortarget(requires JWT bearer token).
- Bank circle members can read P2P intents: Any signer in the
- It is signed by the
ach-signersigner, makingach-signersigner the owner of this policy.
To create the policy, download the intents-policy.json layout file and apply it.
For more detailed information about invoke field in policies and their possible values, refer to the Attaching built-in functions to policy values - invoke chapter of the About Security Policies documentation.
Initial intents
Now that we have the policies and schemas defined, we can create the initial intents which will be used to create the initial money in the ledger. All intents have the following properties:
- Signed by the
ach-signersigner, makingach-signersigner the owner of these intents. - Schema
intent-schemais used for all intents. - Policy
default-policyis used for all intents.
Following intents will be created:
issue_money_usd_ach- intent to issue 10,000,000.00 US dollars to theach-walletwallet.issue_money_dop_ach- intent to issue 10,000,000.00 Dominican pesos to theach-walletwallet.issue_money_usd_tesla- intent to issue 1,000,000.00 US dollars to thetesla-walletwallet.issue_money_dop_tesla- intent to issue 5,000,000.00 Dominican pesos to thetesla-walletwallet.issue_money_usd_minka- intent to issue 1,000,000.00 US dollars to theminka-walletwallet.issue_money_dop_minka- intent to issue 5,000,000.00 Dominican pesos to theminka-walletwallet.
To create the initial intents, download the intents.json layout file and apply it.